About Me

My photo
Who am I? Wife. Mother of 2. "Newbie" to fitness. Personal Trainer-in-training. Lover of health. Fitness. Religion. Family. Gluten and refined sugar intolerant. Welcome to my journey. Learn with me.

Tuesday, November 29, 2011

Pesto Stuffed Shells

This is a wonderful meatless recipe that is deliciously tasty and super easy to make. It is a lot like manicotti only not as hard to make. Change it up with your favorite spaghetti sauce.

And the best part? This recipe is from Budget Bytes. Check out their great site for lots of ways to save money on dinner. This particular meal comes in at $8.51 per recipe/$1.42 serving.

Check out their site and the source of the recipe and picture here: http://budgetbytes.blogspot.com/2010/03/pesto-stuffed-shells-851-recipe-142.html


PESTO STUFFED SHELLS
From Budget Bytes
 
12 oz jumbo shells
15 oz part-skim ricotta cheese
4 oz (1 cup) shredded mozzarella
½ cup basil pesto
1 large egg
2 cups fresh spinach (optional)
1 tbsp cooking oil
3 cups (1 jar) pasta sauce

STEP 1: In a bowl, mix together the ricotta, mozzarella, pesto and the egg (the egg keeps the filling from getting too runny when cooked). Roughly chop the spinach and stir it into the cheese mixture. Refrigerate the filling until you are ready to use it.

STEP 2: Cook the pasta according to the directions on the box (boil for 12 min.). I added 1 Tbsp of cooking oil to the boiling water to keep the shells from sticking to each other and the pot. You will still need to gently stir a few times during cooking. Be careful not to over cook the pasta or else it will rip easily and be too mushy after cooking with the filling and sauce. Drain the pasta and rinse with cool water to stop the cooking process. Let the pasta drain.

STEP 3: Preheat the oven to 350 degrees. The shells roll up tight when they are cooked so use the fingers on one hand to hold them open as you spoon about 3 Tbsp of pesto cheese mix into the center of each. There should be enough pesto cheese mix to fill the shell so that it stays open just slightly (the edges should be about 1/2 inch apart). Fill as many shells as you can with the cheese mix.

STEP 4: Spread one cup of pasta sauce in the bottom of a glass baking dish. You want to pack them in tightly in a single layer. If you space them too far apart, they will dry out during the cooking process. Place all of the shells in the baking dish as close together as possible and pour the remaining 2 cups of sauce over top. Bake for about 30 minutes at 350 degrees or until the sauce is bubbling up around the edges.

Wednesday, November 23, 2011

Cinnamon Apple Pancakes with Apple Cider Syrup

This is a wonderful recipe for Fall that is very easy to make and a treat for breakfast, lunch or dinner! I made these one night even though I had something else planned because they sounded really good and they were quick and easy. They definitely didn't disappoint. My whole family loved them - especially my daughter.

I substituted the sugar for honey in this recipe and it still turned out excellent.

*Fun suggestion for people with kids: Pancakes can be a bit hard for little kids to eat and we parents usually have to cut the pancakes up into small pieces. To avoid this all you have to do is pour your batter through a funnel onto your griddle and make Pancake Sticks. They are easy for little hands to hold and dip in the syrup. I think my little girl easily ate twice as much as normal because she was having so much fun dipping her sticks!

Thanks to the wonderful Real Mom Kitchen for this fantastic recipe and picture. It will be a staple at our house! You can see her original post at this site here: http://realmomkitchen.com/8472/cinnamon-apple-pancakes-with-apple-cider-syrup/

Cinnamon Apple Pancakes with Apple Cider Syrup
From Real Mom Kitchen
Printer Friendly Version

CIDER SYRUP:

·         1/2 cup sugar (or substitute with honey)
·         1 Tbsp cornstarch
·         1/8 tsp ground cinnamon
·         1/8 tsp ground nutmeg
·         1 cup apple cider or juice (I used 100% apple juice)
·         2 Tbsp butter
·         1 Tbsp lemon juice

PANCAKES:

·         2 cups complete pancake mix (the kind that you only add water to)
·         1-1/2 cups apple juice or cider (again, I used 100% apple juice)
·         1 apple, finely diced
·         1 tsp ground cinnamon

1.      Start by preparing the syrup. In a medium saucepan, whisk together the sugar (or honey), cornstarch, cinnamon and nutmeg.
2.      Add the cider in and stir until smooth. Cook and stir over medium heat until thickened and bubbly, about 5 minutes.
3.      Reduce heat to a simmer and cook while stirring for 2 minutes longer. Stir in butter and lemon juice until butter is melted.
4.      In a medium bowl, whisk together the pancake mix and cinnamon. Add juice and whisk just until moistened.
5.      Fold finely diced apple into the batter. 
6.      Pour batter onto a greased hot griddle using a 1/4 cup measuring cup; turn when bubbles form on top. Cook until second side is golden brown.
7.      Serve the pancakes with cider syrup. Makes 12 pancakes and 1-1/4 cups syrup.

Wednesday, November 16, 2011

Super Bean Burritos

I love love love love this recipe!!!!!!! Some of the highlights for you: 1) It is easy to make. 2) None of the ingredients are abnormal. 3) It makes enough to feed an army. 4) It is versatile. 5) It has a great flavor. 6) It is healthy. 7) It is meatless but doesn't have to be. (But it really doesn't need the meat.)

Are you convinced yet that you MUST make this recipe? What if I told you that I am making this again tonight? What if I told you that you and your husband and even your kids will have dinner today and lunch tomorrow and you might STILL have leftovers that you can continue to enjoy after that? Or there are even directions for freezing these if you want. What if I told you that I might have even had these for breakfast one day....

So, needless to say, these are excellent. I do have to add one disclaimer: if you don't like onions this is not the recipe for you. It calls for a LOT of different onions. We love onions so that is not a problem for us.

And, like I said, this is a healthy recipe; however, if you want to make it even more healthy you can use brown rice, serve it on whole grain/whole wheat tortillas, use black beans instead of pinto, don't smother it in sour cream and cut back on the cheese. I didn't put cheese on mine at all and didn't feel like it was missing anything. I love eating mine with green salsa; the hubby loves his with red salsa. Like I said, it is versatile.

I also used a whole 8 oz can of tomato paste the first time I made this by accident but I didn't feel like it was a problem at all. In fact, I plan on doing it again tonight!

Thanks a MILLION to Real Mom Kitchen for the picture and recipe. You can visit her fantastic site here: http://realmomkitchen.com/1087/super-bean-burritos/

Super Bean Burritos
From Real Mom Kitchen
Printer Friendly Version

  • 1 cup brown or white rice (or 2 cups already cooked rice)
  • 2 tablespoons olive oil
  • 1 medium onion, diced
  • 3 cloves garlic, finely minced
  • 1 jalapeno, seeds and membrane removed, finely diced (can substitute 1 can of green chiles which is what I did)
  • 1 teaspoon cumin
  • Salt and pepper to taste
  • 3 tablespoons tomato paste
  • 2 cans (15 oz. each) pinto beans, drained and rinsed (I used black beans)
  • 1 1/2 cups water
  • 1 (10 oz) package frozen corn or 1 can whole kernel corn, drained (I personally would recommend the frozen corn)
  • 6 green onions, white and green parts finely chopped
  • 1/2 teaspoon garlic powder
  • 1/2 teaspoon onion powder
  • 16 burrito-sized (10-inch) flour tortillas
  • 2 cups shredded Monterrey Jack cheese (or whatever kind of cheese you have)

  1. Cook rice; set aside. Meanwhile, heat oil in large saucepan over medium heat. Add onion, garlic, jalapeno and cumin; season with salt and pepper. Cook, stirring occasionally, until onions are softened and golden, being careful not to let the garlic burn. Add tomato paste and cook, stirring for 1 minute.
  2. Add one can of beans and mash gently in the pan (a potato masher or fork works great here). Add the second can of beans and the water and stir to combine. Bring to a boil, reduce heat to medium and simmer, stirring occasionally, until thickened, 10-12 minutes, being careful not to let the mixture stick to the bottom of the pot. Add corn; cook to heat through, 2-3 minutes. Stir in onion and garlic powders. Remove from heat; stir in green onions and cooked rice.
  3. Heat tortillas in microwave for about 30-45 seconds or until all are warmed through.
  4. Fill each tortilla with about 2/3 cup bean and rice mixture and 1/4 cup cheese on one side of tortilla. Fold, and hold in sides. Starting from filled end, holding sides in as you work, tightly roll into a bundle. Place on a baking sheet, seam side down, and prepare remaining burritos.
  5. Serve warm immediately, with salsa and sour cream if desired — or, to freeze for later consumption.
For enchilada style:I put 5 burritos in a baking dish. Then I poured a (10 oz.) can of green enchilada sauce. You can use more enchilada sauce if you like. The 10 oz can just gave them a light coating. Make sure that the sauce completely covers the burritos, you can use a spoon to help spread it around. Then sprinkle with 1 cup or so of shredded Monterrey jack cheese. Turn oven to broil. Place baking dish on middle rack of the oven (not the top) and broil until the cheese is nice and melty.

To Freeze: Put burritos on a baking sheet in the freezer for at least 30 minutes, or until very cold so that they don’t come apart in the wrapping process. Remove them from the freezer and wrap each burrito individually in plastic wrap and place all the wrapped burritos in a freezer-safe resealable bag and freeze up to three months.

To reheat from frozen:
Remove plastic wrap from the burrito. Poke holes in the top several times with a fork. Microwave on high for two minutes. Gently poke a few more holes in the burrito and microwave for another minute. Be careful as the burrito will be piping hot!

Tuesday, November 15, 2011

Portobello Burgers

I will be the first to admit that I am not a big mushroom fan. So the idea of making this recipe pretty much terrified me. But I am not about to turn away from new adventures and experiences so I decided to give it a try. Plus, the red pepper mayo sounded really good.

They turned out MUCH better than I expected. They have that weird mushroom texture but it was manageable. One thing you will want to be sure of is to eat these on full buns, not thin ones. These get really messy and the thin buns get soggy too fast.

A typical Ruby Tuesday Veggie burger has 952 calories, 53 g fat and 95 g carbohydrates. This burger recipe, as written (per serving) has 370 calories, 16 g fat (4 g saturated) and 540 mg sodium. If you want to cut that back even further cut down on the cheese and load up your burger with more veggies.

This picture and recipe are courtesy of Cook This, Not That and can be found at this site here: http://cookthis.menshealth.com/recipes/cook-mushroom-melts

PORTOBELLO BURGERS
From Cook This, Not That

2 Tbsp mayonnaise
Juice of 1/2 lemon
1/4 cup finely chopped roasted red peppers
1 clove garlic, minced
4 large portobello caps, stems removed
1 Tbsp olive oil
1 Tbsp balsamic vinegar
1 tsp dried Italian seasoning
Salt and black pepper to taste
1/2 cup shredded mozzarella
4 slices red onion
4 potato rolls or whole-grain buns
A few handfuls of mixed greens, arugula, or other lettuce

How to Make It:
*Heat a grill or grill pan. Combine the mayonnaise, lemon juice, red peppers, and garlic. (For a uniformly red mayo, puree in a food processor.)

*Rub the mushrooms with the olive oil, vinegar, Italian seasoning, and salt and pepper. Grill, top side down, for 2 to 3 minutes, until the cheese is melted and the mushrooms are fully cooked. While the mushrooms are cooking, grill the onions until browned and toast the buns.

*Top each bun with greens, grilled onions, mushrooms, and the red pepper mayo.

Friday, November 11, 2011

Ultimate Beef Stroganoff (Slow Cooker)

I grew up eating wonderful beef stroganoff that my mom would make for Sunday dinner on occasion. The biggest problem with my mom's original recipe is the amount of time and effort that it takes to make. This recipe is a slow cooker recipe that allows for much less effort; however, my mom would never make this recipe because it calls for mushrooms and onions. If you don't like mushrooms and onions than this probably isn't the recipe for you but if you do it is great!

The picture and recipe are courtesy of Mel's Kitchen Cafe and can be found at this site here: http://www.melskitchencafe.com/2008/04/the-ultimate-beef-stroganoff.html

The Ultimate Beef Stroganoff
from melskitchencafe.com

Printer Friendly Version

Ingredients:
2-3 pounds stew meat (or a 3-pound chuck roast, cubed)
1 teaspoon salt
1/4 teaspoon black pepper
1 medium yellow onion, diced
¼ teaspoon garlic salt
1 tablespoon Worcestershire sauce
1 ½ cups beef broth or stock
1 tablespoon ketchup
1/3 cup flour
6-7 tablespoons apple juice or water
4-8 ounces sliced mushrooms
1/2 cup light or regular sour cream

Directions:
Place the stew meat, salt, pepper and onion in the slow cooker. Stir to distribute the seasonings and onion. In a small bowl, combine the garlic salt, Worcestershire sauce, beef broth and ketchup. Pour over the meat. Cook for 7-9 hours on low or 4-5 hours on high. About 30 minutes before serving, combine the flour and apple juice in a small bowl, whisking vigorously to combine well. The roux should be thick but still pourable so add a tablespoon of apple juice or water at a time to thin, if needed. Pour the flour mixture into the slow cooker, whisking quickly to mix in the roux with the stew meat and juices and to avoid lumps. Add the mushrooms and stir. Cook on high for 30 minutes. Stir in ½ cup sour cream right before serving. Serve over pasta, rice or baked potatoes.

*Freezable Meal: The leftovers of the stroganoff can be frozen. I store the leftovers in a freezer-safe container and then thaw in the refrigerator (usually takes about a day) and reheat over medium-low heat in a saucepan on the stove.

Wednesday, November 9, 2011

Kielbasa and Potatoes

This is a very basic "meat and potatoes" recipe that is easy to make. I am not going to post the nutritional information for the original recipe because it has WAY too much unnecessary fat in it. Just a few simple changes make this so much better for you and those changes are reflected in my recipe below. Also, the original cooking time is WAY too long. Keep a close eye on it and it will be great!

You can also add additional spices if you like - a little garlic or seasoned salt instead of normal salt would taste great! I would also recommend replacing one of the green peppers with a red pepper.

This picture and recipe are from Allrecipes.com and can be found at this site here: http://allrecipes.com/recipe/polish-meat-and-potatoes/detail.aspx

Kielbasa and potatoes
From Allrecipes.com
Printer Friendly Version

·         4 potatoes, peeled and cut into 1 inch cubes
·         1 onion, chopped
·         2 green bell peppers, cut into 1 inch pieces
·         1/2 teaspoon onion powder
·         1/2 teaspoon garlic powder
·         1/2 teaspoon salt
·         1/4 teaspoon black pepper
·         1  - 2 tbsp olive oil
·         1 (16 ounce) package light kielbasa sausage, cut into 1/2 inch pieces (I would also recommend turkey sausage if you can find it)

1.      Heat oil in a large skillet over medium-high heat. Sautee the thinly sliced kielbasa until it is nicely browned. Use a slotted spoon to remove sausage to a warm platter. Cook onions and potatoes for 15 minutes, stirring occasionally. Reduce flame to medium and stir in bell pepper, onion powder, garlic powder, salt and pepper. Cover, and cook 5 minutes. Stir in kielbasa, cover, and cook until onions are caramelized.

Friday, November 4, 2011

Peanut Butter and Chocolate Krispie Treats

I don't usually make things that are quite this... sinful. But I needed a dessert to take to a party and these are so easy to make and SO extremely delicious. The krispies are a perfect texture compliment to the gooey peanut butter and chocolate. And although these little delights are sinful they are pretty rich so I would be surprised if anyone could get down more than 1 or 2 bars. I had 1/2 of a bar and it was plenty for me although they were really good and I wish my sugar meter wasn't quite so short sometimes.

I doubled this recipe for the party and put my concotion in an 11x17" pan. They were completely gone by the time dinner was almost over. Completely. That is how delicious these are!

This lovely recipe and picture are courtesy of Jamie Cooks it Up and can be found at this site here: http://jamiecooksitup.blogspot.com/2011/09/peanut-butter-and-chocolate-krispie.html

Peanut Butter and Chocolate Krispie Treats
www.jamiecooksitup.blogspot.com
Time: 15 minutes + 30 minutes for chocolate to set
Yield: A 9x9 pan, cut as small or large as you like

Printer Friendly Version

1 C sugar
1 C light corn syrup
1 C peanut butter (I used creamy)

4 1/2 C rice krispie cereal
1 t vanilla
2 C chocolate chips (I used semisweet)

1. Pour your rice krispies into a large bowl and set it aside.
2. Into a medium sized sauce pan pour the corn syrup and sugar. Mix it together and bring it to a boil over medium high heat, stirring constantly. Let the yummy concoction boil for 1 minute, then remove it from the heat.
3. Add the peanut butter to your sauce pan and mix it all in.
4. Stir in a splash of vanilla.
5. Pour the peanut buttery, sugary concoction of bliss over the top of your rice krispies. Use a wooden spoon to stir it until all of the cereal is coated nicely.
6. Spray a 9x9 pan with cooking spray and pour the coated cereal into it. Spray your hands with cooking spray and use them to press the peanut buttery goodness to the sides and corners of the pan.
7. Pour your chocolate chips into a glass bowl or measuring cup. Heat in the microwave for 30 seconds. Stir it. Heat it for another 30....stir it. Heat it again for 30 seconds and stir until smooth. You don't want to get the chocolate too hot, here. It will turn pasty and chalky and all your dreams will crumble into ruins right before your eyes. Just heat it slowly and life will be swell.
8. Pour the chocolate over the top of the yummy cereal and spread it evenly. Pop the whole pan in the fridge to chill for about 30 minutes, to allow the chocolate to set up. If the bars are left in the fridge for an extended period of time, they will get hard enough to break a butcher knife. Okay, maybe not that hard but I made this mistake and they were REALLY hard! But don't worry about it! Leave the pan on the counter until the bars have reached room temperature and the texture will be just perfect.
9. Once the chocolate has set, remove the pan from the fridge and cut into bars.

Thursday, November 3, 2011

Roasted Sweet Potatoes

This is an incredibly easy and tasty side dish that goes well with so many meals! We have these at our house a lot. They are flavorful and filling and much better for you than normal fries or even other potatoes. YUMMY!

The picture is courtesy of For The Love of Cooking and can be found at this site here: http://fortheloveofcooking-recipes.blogspot.com/2009/03/roasted-sweet-potatoes.html

ROASTED SWEET POTATOES
From Shayla's Kitchen

2 large sweet potatoes
1 1/2 tbsp olive oil
1/2 tsp cinnamon
Your favorite dipping sauce (ketchup, bbq sauce, fry sauce, etc,)

Preheat oven to 400 degrees. Cut the sweet potatoes into cubes. (You can peel them first if you wish but I didn't.) Toss cubes with olive oil and cinnamon. Place in a single layer on a baking sheet and roast for 25-30 minutes. Serve with dipping sauce available. (We prefer Sweet Baby Ray's BBQ Sauce)

Wednesday, November 2, 2011

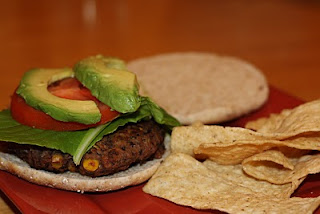
Black Bean Burgers

My first experience with a black bean burger was at Costco with an obliging sample cart. My mom and I decided to give it a try and were so impressed with how delicious they were! Ever since that time I was determined to have them again and was thrilled when I stumbled across a recipe for them on Sweet Treats and More that looked so easy.

I will admit that the recipe was a little harder to make than I expected, but it wasn't bad. And the burgers were so delicious. My whole family loved them and gobbled them all down. Whether you are a meat lover or meat hater, this is a recipe that all will enjoy!

The picture and recipe are courtesy of Sweet Treats and More and can be found at this site here: http://www.sweettreatsmore.com/2010/06/black-bean-burgers.html

Black Bean Burgers
From Sweet Treats and More

1 16 oz. can of black beans, drained well
1/2 c. frozen corn kernels
2 pieces of bread crumbled
1 egg white
2 tbs. flour
3 tbs. chunky salsa
1/2 tsp. cumin
1/2 tsp. garlic salt
1/2 tsp. onion salt
salt and pepper to taste
olive oil (for cooking)
Tomato, Avocado, and Lettuce for toppings, OroWheat Sandwhich Thins for buns.

1. Drain black beans then mash until almost smooth using large fork or potato masher.
2. Mix in all other ingredients and shape into 4 medium size patties.
3. Heat a large pan with thin coat of olive oil on bottom. Cook patties on medium-high heat for 5-10 minutes each side.