About Me

My photo
Who am I? Wife. Mother of 2. "Newbie" to fitness. Personal Trainer-in-training. Lover of health. Fitness. Religion. Family. Gluten and refined sugar intolerant. Welcome to my journey. Learn with me.

Saturday, July 30, 2011

Twice Baked Potatoes

It seems like one of the hardest parts of meal planning is planning what to serve with your incredibly awesome main course. You want something delicious and complimentary to your main dish but you absolutely don't want to spend the amount of time preparing it that you would a main course.

The second conundrum that you may face that this amazing side dish will solve is the bother of getting to dinner, very hungry, only to have to assemble a baked potato. In fact, my husband dislikes this so much that he will take any kind of style of cooking potatoes as long as he doesn't have to do the compiling. Now, obviously, if you are doing the cooking this isn't going to help you but everyone else will love you for doing the "hard" work.

And honestly, this was so easy! I threw my potatoes in the oven for an hour, compiled my main course, and then finished these up while my main course was cooling off enough that we could consume it. And they were DELICIOUS! My husband loved it and I loved it and I can't wait to eat the leftovers today! This was a perfect pair with our Steak with Onion-Bleu Cheese Sauce and is a recipe we will repeat again and again!

The recipe and picture are courtesy of the wonderful Mel's Kitchen Cafe and can be found at this site here: http://www.melskitchencafe.com/2010/05/twice-baked-potatoes.html


Twice-Baked Potatoes
from My Kitchen Cafe (www.melskitchencafe.com)

*Serves 8 (as a side dish)

 4 large-ish russet potatoes, scrubbed clean
2 tablespoons butter, melted
2 cups shredded sharp cheddar cheese, divided
4 green onions, white and green parts thinly chopped
1/2 cup sour cream
1/4 cup milk
1 teaspoon salt
1/2 teaspoon freshly ground black pepper

Preheat the oven to 400 degrees. Pierce each potato three or four times with a fork and place in the oven (or on a baking sheet). Bake for about an hour, until a fork can easily be inserted into the potato. Remove the potatoes from the oven. Let them cool for about 5-10 minutes.

Carefully cut each potato in half lengthwise, so you get two "boat" shapes from each potato. Using an oven mitt or potholder, hold the potato in one hand and with a spoon scoop out the flesh into a bowl. Leave a thin border (a little less than 1/4-inch) of potato innards around the skin so that it isn't too fragile to hold the pumped up potato mixture.

Mash the potato flesh with a potato masher or fork until mostly smooth. Stir in the melted butter, 1 cup cheese, green onions, sour cream, milk, salt and pepper. Mix well.

Preheat the broiler and move an oven rack about 3-4 inches away from the broiler heating element.

Scoop the potato filling into the shells, mounding each potato shell full of the good stuff. Sprinkle the potatoes with the remaining 1 cup cheese and broil the potatoes until the cheese is golden and bubbly, about 5 minutes.

Friday, July 29, 2011

Steak with Onion-Bleu Cheese Sauce

Wow! This was an amazing meal! I have never cooked steak before and so I was pretty nervous about making the attempt but I will be nervous no more! I found a great website that gives tips for perfect cooking methods for steak. If you would like to check it out as well the site can be found at this link here: http://startcooking.com/blog/276/3-Ways-to-Cook-a-Great-Steak. Just make sure that when you do follow the method suggested for grilling that your steaks are thin - like no more than 1/2 inch. Some of our bigger steaks turned out pretty pink in the middle. Personally I like my steak to still be mooing but it was a bit too rare for my husband in some parts. BUT! Considering it was my first attempt at cooking steak by myself I will call it a successful attempt.

This meal can't be found on any kind of healthy meter but it is so delectable that you can forgive yourself for indulging. Plus, the sauce is rich and filling so I don't think you could eat more than one good sized steak anyways. My hubby absolutely loved this sauce and still could only get down one steak! If you know my Jake that is just short of a small miracle.

Now I know that the recipe calls for ribeye steak but you don't have to use ribeye. Ribeye is an excellent cut of meat and is generally regarded as the most tender and desirable BUT that also means it is generally the most expensive. I saw it on "sale" at my local grocery store for $5.99/lb. We weren't about to pay that price so we picked up some beautiful looking top sirloin on sale for $2.99/lb. And it was still delicious!

This recipe is so easy to make and has so few ingredients that you should DEFINITELY make it unless you are severely anti-onion. This one is going into our favorites and will be repeated at our house again and again!

The picture and recipe are courtesy of The Pioneer Woman and can be found at this site here: http://thepioneerwoman.com/cooking/2009/09/grilled-ribeye-steak-with-onion-blue-cheese-sauce/

STEAK WITH ONION-BLEU CHEESE SAUCE
From The Pioneer Woman

  • 2 whole ribeye steaks
  • 2 Tbsp. butter (unless you are grilling your steaks in which case you should just brush the grill with a bit of oil before setting your steaks down)
  • Salt
  • Pepper
  • 4 Tbsp. butter
  • 1 very large yellow onion, sliced into relatively thick slices
  • 1 cup heavy cream
  • 1/2 cup crumbled blue cheese
Salt and pepper both sides of the steaks. Grill in 2 Tbsp. butter until cooked to your liking (medium-well is my favorite). Saute onions in 4 Tbsp. butter over high heat for 5-7 minutes, or until dark and caramelized. (Be careful not to let them BLACKEN too badly. A little black is okay.) Reduce heat to simmer and pour in cream. Cook for 3-5 minutes, or until reduced by half. Stir in blue cheese until melted. Serve a generous portion of sauce over steaks.

*NOTE: A very easy method to follow for slicing your onion is to first cut it in half from root to tip, leaving the ends in tact. This helps to hold it all together and makes slicing it a breeze!

Thursday, July 28, 2011

Maple Meatballs

Are any of you frequent potluck-party-goers out in the grand blogosphere familiar with Lil' Smokies? They are miniature sausages in a barbecue sauce - normally heated in a slow cooker. They are quite popular here in Utah and frequently grace a potluck table. Well my confession is... I am not a fan. It is probably because I am not a big fan of sausage but I like sausage a WHOLE lot more than I like Lil' Smokies.

But I always like a nicely flavored meatball and so when I ran across this recipe I knew it was one that I wanted to try. I have had it saved for a long time because it is not a recipe that calls for ingredients I would normally have on hand. If you have pure maple syrup and chili sauce on hand - props to you. I have actually never even purchased either of those. The chili sauce bottle looks just like a ketchup bottle and it tastes a lot like it too (with a slight kick to it). I was expecting a lot more heat and was pleasantly surprised when I tested it before dumping it into my pan. Not that I don't like heat but when it calls for as much maple syrup as it does chili sauce you have to worry a bit... If you have an aversion to heat, this is not a recipe that you need to avoid. The finished product is nothing I would consider "hot."

Everyone loved these meatballs and the aroma they gave off drove everyone mad with longing. Everyone talked about how good they were and praised my cooking abilities.

We'll just keep it as our secret about how simple this recipe really is. Now I just need to make some more meatball meals to use up the other 4 pounds of meatballs I have....

The picture and recipe are courtesy of Real Mom Kitchen and can be found at this site here: http://realmomkitchen.com/456/maple-meatballs/

Maple Meatballs
Real Mom Kitchen (I doubled the recipe - meatballs and sauce.)

1/2 cup real maple syrup
1/2 cup chili sauce
2 teaspoons dried chives (or 2 tablespoons fresh chives)
1 tablespoon soy sauce
1/2 teaspoon ground mustard
26 (1 pound) frozen, fully cooked meatballs, thawed

In a saucepan, combine syrup, chili sauce, chives, soy sauce,and ground mustard. Bring to a low boil. Add meatballs and then return to a boil. Simmer over medium heat for 8-10 minutes, stirring occasionally until meatballs are thoroughly heated. Serve as an appetizer with toothpicks or over hot cooked rice. Makes 5-6 servings.
 

Wednesday, July 27, 2011

Blueberry Fool

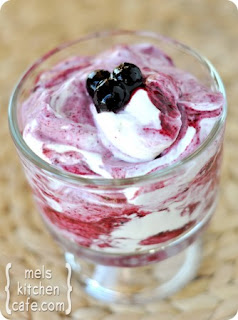
If you are wondering about the strange name of this post I will explain. A fool is a traditional British dessert. It is basically just a mix of pureed fruit, cream and a little bit of sweetener. I want to put a special emphasis right now on the LITTLE BIT of sweetener. If you go into this dessert expecting it to be pretty sweet you are going to be disappointed. Most of the sweetness comes from the fruit itself. That being said, however, this was a wonderful and refreshing dessert that was perfect for these miserably hot summer days. The ones we made didn't look nearly as pretty as this picture from Mel's Kitchen Cafe, but they tasted delicious nonetheless. Even my picky toddler gobbled it up!

Just another little note... don't try substituting things with this recipe. It calls for heavy whipping cream and you should NOT try using any other kind of cream. Been there. Done that. DON'T make the same mistake!

This recipe and picture are courtesy of Mel's Kitchen Cafe and can be found at this site here: http://www.melskitchencafe.com/2011/07/blueberry-fool.html


Blueberry Fool
From melskitchencafe.com

*Note: The blueberry mixture can be prepared and refrigerated up to a day in advance but don't prepare the cream mixture until ready to serve.
*Makes 6 servings

3 cups fresh blueberries
1/3 cup granulated sugar
1 teaspoon cornstarch
Pinch of salt
2 teaspoons lemon juice
1 1/4 cups heavy cream
2 tablespoons powdered sugar
1 small carton (about 5-6 ounces) plain Greek yogurt, regular or nonfat
1 teaspoon vanilla extract
Additional blueberries, optional

In a saucepan, combine berries, granulated sugar, cornstarch, salt and lemon juice. Cook over medium-low heat, stirring often, until sugar dissolves, berries have softened and juices have thickened slightly, about 10 minutes. Remove from heat, transfer to a bowl and let cool to room temperature, stirring occasionally. Cover and refrigerate until cold, about 1 hour. This step can be prepared up to a day in advance.

Just before serving, in a large bowl, using an electric mixer (handheld or stand mixer), beat the cream and powdered sugar until soft peaks form. Add yogurt and vanilla and beat until medium peaks form and the mixture is creamy and very thick. If you have trouble getting the cream to whip up, try chilling your bowl and beaters before whipping the cream.

Using a large spatula, gently fold blueberry mixture into cream mixture until just barely combined, with streaks remaining. Divide mixture among 6 bowls, top with additional blueberries, if desired, and serve.

Tuesday, July 26, 2011

How to Boil Corn on the Cob Perfectly

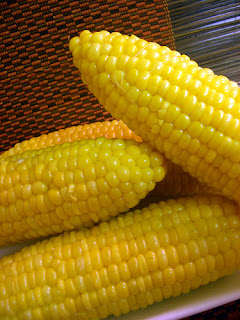
Okay so this is really  not something I ever even thought about until I was about to put my corn in the pot and thought... uh oh... how do I do this? It seems simple enough, right? Husk corn, remove gross silky things, fill pan with water, bring to boil, remove corn.... But I knew that there had to be more to it than that. I turned to my trusty Google search engine and met the wonderful sight Joyful Abode with a post titled "How to Boil Corn on the Cob Perfectly." Fantastic! I read the reviews to make sure that it lived up to the hype and, sure enough, we went for it.

Now I have to admit that I should have Googled "how to pick out the perfect corn" before I bought my pieces and I was pretty skeptical about how they would taste - especially since we were supposed to be using them as a portion of a dinner we were serving to other people. But even with my less-than-average-corn-choosing-skills these turned out PERFECT! They were sweet and crunchy and I liked them so much that I might just have to get the leftovers out of the fridge right now and eat them! And when it is this simple, why not just try it?

The recipe and picture are courtesy of Joyful Abode and can be found at this site here: http://www.joyfulabode.com/2008/05/08/how-to-boil-corn-on-the-cob-perfectly-too-easy-for-a-recipe/

CORN ON THE COB – PERFECT BOILING METHOD
From Joyful Abode

  • Fill your pot with water.
  • Add 1/4 cup to 1/2 cup of sugar.
  • Drop in your corn.
  • Bring everything to a boil, making sure the sugar is dissolved in the water.
  • Boil for no longer than 8 minutes.
  • Remove from the water and let it cool enough for handling and eating.
  • Handle it and eat it

Sunday, July 24, 2011

Swiss Steak

For a good portion of my marriage up to this point I have only ever purchased two kinds of meat: chicken and ground beef. (And occasionally ham) Both are easy to come by and very inexpensive. Well you may not have noticed like I have, but ground beef hasn't gone on sale in a really long time. And if it isn't on sale then it is just as expensive (or more) than some more tasty cuts of meat: i.e. steak, pork, roast, etc. Because of this dilemma I have really branched out and explored a lot of different meats lately.

Am I the only one that gets really nervous when cooking a roast? It is so easy to dry them out and then they get to be unpleasant to eat. But only practice makes perfect and I am getting better about judging the best cooking time. I cooked my roast for 1 hour and 15 minutes on high and 3 hours and 30 minutes on low. I also cooked this meal in my big slow cooker (6.5 quart) and it filled it COMPLETELY. This is another one of those meals that would be great to share with some friends.

A good tip to remember when using a slow cooker is that it should be at least 1/2 to 3/4 full. If the recipe you are using does not fill your slow cooker this much you should use a smaller slow cooker. This will help to avoid burning and uneven cooking.

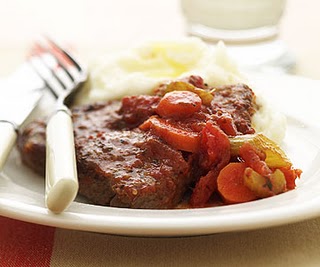
This is a great and traditional American meal. Meat, potatoes, carrots.... serve it up with some barbecue sauce and it is delicious and comforting. The tomatoes, garlic and Worcestershire sauce give it just enough of a flavor without being too overwhelming and it is a nice change from the normal onion flavored roasts. The only thing that I would change when making this recipe again is that I will remove the fat and sear my roast before putting it in the slow cooker. We used this method when we made the Pepperoncini Beef Sandwiches and I think it made the roast 10 times better. It helps seal in all of the wonderful juices and promotes a tender finished product.

This recipe is courtesy of my good friend Merideth at Mer's Kitchen Creations and can be found at this site here: http://merskitchencreations.blogspot.com/2010/12/swiss-steak.html

The picture is courtesy of Better Homes and Gardens and can be found at this site here: http://www.bhg.com/recipe/beef/swiss-steak/

*NOTE! The Better Homes and Gardens version of this recipe has methods for cooking this dish on the stove or the oven instead of in a slow cooker. If that is something you are interested in you may want to check out the site I listed above for the location of the picture!

SWISS STEAK
From Mer’s Kitchen Creations (Adapted from Better Homes and Gardens)

  • 1 medium-size pot-roast, OR 1 lb. boneless beef round steak
  • 3-4 large carrots, cut into small 1-inch pieces
  • 1 medium onion, diced
  • 2-3 small potatoes, cut into 1-inch cubes
  • 1 14.5 ounce can Italian-style diced tomatoes, undrained
  • 2 Tbsp. worcestershire sauce
  • 1 clove garlic, minced
  • Salt and pepper to taste
Lay meat on bottom of the crock pot and sprinkle with carrots, onions, and potatoes. Pour tomatoes, worcestershire sauce and garlic over everything. Cover and cook on low for 6-8 hours, or on high for 3-4 hours, or until meat is tender and cooked through. Serve and add salt and pepper to taste.

Optional: Omit the potatoes and serve over mashed potatoes, rice, or cooked pasta noodles.

Saturday, July 23, 2011

Giant Cinnamon Twists

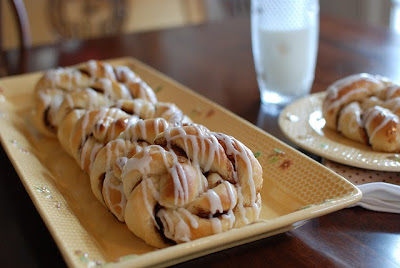
I have been craving cinnamon rolls for a long time and, since I have never made them myself, I wanted to take on the challenge! There are so many different cinnamon roll recipes and I know many people will say they have "the best" one. What really caught my eye with this recipe was how beautiful the rolls look. I love presentation when it comes to my bread products and if I have something sweet and sinful I want it to look as tempting and delicious as possible!

These turned out so great. I was extremely careful abuot the amount of flour I used and I thought it was perfect in texture. My dad said that they were chewy and substantial without being too dense. Since we come from a family of bakers I always regard comments like this with great satisfaction.

This recipe will definitely be a repeat in our household. The original recipe and picture are courtesy of a new favorite blog site of mine, Simply So Good, and can be found at this site here: http://simplysogood.blogspot.com/2011/05/giant-cinnamon-twists.html

Please note that this is HALF of the original recipe. I had no occasion for 30+ rolls and I don't have a mixer that could have handled the full recipe anyways. Although now that all of the rolls that I did make are gone I am wishing I had made more... :-)

Giant Cinnamon Twists
Adapted from Simply So Good

2 eggs
1/3 cup sugar
1 ½ teaspoons salt
6 Tbsp butter
2 cups milk
1 Tbsp + 1 ½ tsp yeast
5 - 6 cups flour

Filling:
1/4 cup butter, melted
1/4 cup sugar
1 tablespoon cinnamon

Clear Glaze (I did NOT half this portion of the recipe):
1/2 cup sugar
1/4 cup water
1 tablespoon light corn syrup

Sugar Glaze:
1 cup confectioners' sugar
2 tablespoons milk

In the large bowl of a mixer, beat eggs. While the mixer is running add in the sugar and salt. In a medium size sauce pan melt butter. Add the milk and heat until the milk is lightly warmed about 110 degrees. (If you don’t have a thermometer, just test it with your finger. The milk should feel warm but NOT hot.) Remove from the heat and pour into the egg mixture. Mix until combined. Sprinkle yeast over milk mixture and let stand for about 2 minutes to soften the yeast. Whisk into the milk mixture. Add 3 cups of flour and beat until dough is smooth. Add remaining flour 1/2 cup at a time until dough is smooth and slightly sticky or until the dough begins to pull away from the sides of the bowl while mixing. Place the dough in a very large bowl that has been lightly oiled. Cover with a clean cloth and allow to rise until doubled in size. About 45-60 minutes.

Punch down the dough or pull it away from the sides so that the dough deflates. Roll dough into a 24 x 13-inch rectangle on a lightly floured surface. Spread the lower half of the dough with butter and sprinkle with the sugar cinnamon mixture. Fold down the upper half of the dough over the cinnamon sugar. Cut into 1- 1 1/2-inch strips. Twist each strip of dough then tie in a knot. Place on a greased baking sheet. Cover with a clean cloth and allow to rise for 45-60 minutes. (The roll should feel fluffy like a marshmallow when you touch it.) Bake in a pre-heated 375 degree oven for 10-12 minutes or until golden brown. Remove from oven and brush with clear glaze. When the rolls have cooled drizzle with sugar glaze using a fork.

To make the clear glaze: Add the sugar, water and corn syrup into a small saucepan. Bring to a rolling boil. Remove from the heat and cool.

To make the sugar glaze: In a small mixing bowl combine confectioners' sugar and milk. Beat until smooth and has no signs of lumps.

Yield: about 18 rolls

*NOTE: The rolls need to cool down so that you can put the sugar glaze on them without making a big mess, but everyone knows that cinnamon rolls are better warm. Stick a roll in the microwave for 20 seconds when you are ready to eat it. They get nice and gooey again and are SOOOO good!

Thursday, July 21, 2011

Skillet Chicken Parmesan

WOW! This was a fantastic dish! I seriously wish I had room for another helping but it is also very filling. This ONE skillet meal came together quickly and easily and we just ate it up. The rich marinara sauce made from SCRATCH combines with heavenly melted cheeses and tender, juicy chicken to make a dish that will grace our table again and again. This recipe is courtesy of Mel's Kitchen Cafe and while she says that it is nothing fancy, it is easily as beautiful and tasty as the meal my hubby and I had at Carino's Italian restaurant last night! And the best part? No $30 price tag for this one!

I mentioned on my last post that my favorite place to get pre-baked bread is from Wal-mart. Do you know the baskets of fresh baked french bread that they have by the check-out stands for $1 each? Well if you go back to the bakery section itself they have various "flavors." I bought a $0.98 loaf of parmesan garlic french bread to pair with this meal. I cut it in half, brushed it with butter, sprinkled it with a little fresh grated parmesan and broiled it in the oven for 2-3 minutes just until it was golden brown. My husband loved it so much he said it was like eating candy!

Let's talk for just a minute about parmesan. Now, if you are like me, you have a big bottle of grated parmesan above your oven that you have used in all dishes that call for parmesan since the beginning of time. My mother, once again, showed me the error of my ways. She buys fresh parmesan pre-"grated"/shredded and then measures out 1 cup into sandwich baggies to freeze for later use. After tasting the difference between her parmesan dishes and mine I decided that I had to try it out - and I will NEVER go back. The fresh parmesan makes such a huge difference in the flavor of the dish. And the price tag really isn't that different. I can get a big bag of parmesan at Sam's Club for about $9. It comes out to be 6+ cups. And how often are you going to use an entire cup for one recipe? I keep one baggie in the refrigerator and the rest in the freezer. When one bag runs out you just stick the next bag in the fridge!

This recipe makes 6 hearty portions so invite some friends over and prepare to WOW them. Or, be selfish like us and hoard it all to eat for leftovers the next day. :-)

The recipe and picture can be found at Mel's fantastic blog located at this site here: http://www.melskitchencafe.com/2011/05/skillet-chicken-parmesan.html

Skillet Chicken Parmesan
from melskitchencafe.com

*Note: I use really thick boneless, skinless chicken breasts to make thinner cutlets (by cutting in half lengthwise) but if you don't have or can't find thick chicken breasts, use thinner chicken breasts, keeping an eye on cooking time to make sure they cook all the way through.

*Serves 6

2 cloves garlic, finely minced
28-ounce can crushed tomatoes
14.5-ounce can diced tomatoes, drained
1/2 teaspoon dried oregano
1/2 teaspoon dried basil
1 teaspoon sugar
1/2 teaspoon salt
1/2 teaspoon black pepper
3/4 cup freshly grated Parmesan cheese, divided
3 boneless, skinless chicken breasts, cut in half lengthwise to make 6 thinner chicken cutlets
Salt and pepper
1/2 cup all-purpose flour
2 tablespoons canola oil
3/4 cup shredded mozzarella cheese
3/4 cup shredded provolone or sharp provolone cheese (I didn't have this on hand and didn't want to buy it so I just used double the mozzarella)
Hot spaghetti noodles for serving

In a medium bowl, combine the garlic, crushed tomatoes, diced tomatoes, oregano, basil, sugar, salt, pepper and 1/4 cup Parmesan cheese. Set aside.

In a large 12-inch skillet, heat the canola oil over medium heat until rippling and hot. Thoroughly dry the chicken pieces and season with salt and pepper on both sides. Place the flour in a shallow dish and dredge the seasoned chicken pieces in the flour, coating both sides. Gently place 3-4 of the chicken pieces in the hot oil and cook for 3 minutes and then flip and cook 3 minutes longer until a nice golden crust has formed on the chicken (they'll continue to cook in a later step). Remove the chicken to a plate and continue with the remaining pieces, removing them to the plate when they have been browned.

Wipe the skillet of excess oil and pour the sauce contents in the bowl into the skillet, taking care of splatters if the skillet is still piping hot. Turn the heat to medium and gently nestle the pieces of browned chicken into the sauce, making room for all six chicken breast cutlets. The chicken should be mostly covered with the sauce. Cover the skillet and simmer the sauce and chicken on medium or medium low for 15 minutes, checking every few minutes to make sure the chicken isn't sticking to the bottom of the skillet. If so, turn the heat down a bit.

Uncover the skillet, sprinkle the mozzarella, provolone and remaining Parmesan cheese over the chicken and sauce. Cover and cook for five more minutes, or until cheese is nicely melted.

Serve over hot spaghetti noodles, if desired.

Tuesday, July 19, 2011

Slow Cooker Tex-Mex Chicken

I recently learned that one of my friends from high school also has a cooking blog and after scanning through her recipes I knew that there were SEVERAL I had to try and this was one of them! Head on over to Mer's Kitchen Creations and check out her awesome site!

I will admit that I was a bit skeptical about this recipe as I was throwing it together. I am not into chunks of soggy veggies in things and I thought that my onions and green pepper would end up just that after this lengthy cooking time - soggy. But my fears were unfounded. Even after cooking this dish for 1 hour on high and 4 hours on low my green peppers were still slightly crunchy and the taste was wonderful. Our whole family loved this one and it is so simple, easy to put together and relatively healthy that we will definitely be making it again!

The picture is courtesy of Kraft Recipes (where the original recipe came from) and can be found at this site here: http://www.kraftrecipes.com/recipes/slow-cooker-tex-mex-chicken-107258.aspx

The recipe listed below is Merideth's adapted recipe. After looking at both recipes this is definitely the recipe that I would have preferred and I am glad she made the changes that she did! The link to her adapted recipe can be found at this site here: http://merskitchencreations.blogspot.com/2011/02/slow-cooker-tex-mex-chicken.html

SLOW COOKER TEX-MEX CHICKEN
From Mer’s Kitchen Creations

·         1 lb. boneless, skinless chicken breasts, cut into 1-inch cubes
·         1 package reduced-sodium taco seasoning (or about 2 - 3 Tbsp. if you are like me and have a big bottle of taco seasoning)
·         1 green or red pepper, diced
·         1/2 yellow onion, diced
·         1 cup frozen corn
·         1 1/2 cups medium salsa (medium gives it a lot more flavor than mild)
·         1/2 cup cheddar cheese, shredded

Toss chicken with taco seasoning in slow cooker. Add in everything but the cheese and stir to combine. Cook on low 6-8 hours, or on high 3-4 hours, or until the chicken is cooked through. Serve topped with shredded cheese, cilantro and sour cream. Tastes great by itself, but it is even better if you serve it over hot cooked rice.

Adapted from Kraft Recipes

Sunday, July 17, 2011

Honey-Chipotle Barbecue Chicken Sandwiches

Regardless of the fact that I am no longer pregnant, I am still on a serious sandwich and lemonade kick. Sandwiches are so great for the summer time - especially when they are as delicious as this sandwich! This spicy yet sweet combination of honey and chipotle makes for a mouthful of awesomeness! Add to the fact that this is pretty simple to make and what more could you ask for? How about the fact that it is another recipe that comes from Cooking Light? Delicious AND better for you?! What is that about!?

This sandwich is DEFINITELY going to go on our rotation. Although... I may have to wait awhile to make it again because it gave my poor nursing baby some pretty bad gas...

The picture and recipe are courtesy of Myrecipes.com and can be found at this site here: http://www.myrecipes.com/recipe/honey-chipotle-barbecue-chicken-sandwiches-10000001054888/

HONEY-CHIPOTLE BARBECUE CHICKEN SANDWICHES
Adapted from Myrecipes.com

·         1/2 cup water
·         1 teaspoon ground cumin
·         4 garlic cloves, thinly sliced
·         1 pound skinless, boneless chicken breast
·         1 (7-ounce) can chipotle chiles in adobo sauce or 1/2 tsp. ground chipotle chiles
·         1 tablespoon canola oil
·         1 tablespoon minced garlic
·         1 teaspoon ground cumin
·         1/2 cup canned tomato puree (see note below)
·         1/4 cup cider vinegar
·         3 tablespoons honey
·         1 tablespoon Worcestershire sauce
·         1/4 teaspoon salt
·         4 (1 1/2-ounce) sandwich rolls
·         2 ounces Monterey Jack cheese, thinly sliced (we used havarti - use what you have on hand!)
·         4 (1/8-inch-thick) slices red onion

Combine water, 1 teaspoon cumin, 4 sliced garlic cloves, and chicken in a large saucepan. Cover and bring to a boil over medium-high heat. Reduce heat to medium-low; cook 10 minutes or until chicken is done. Drain, and place chicken on a cutting board. Cut chicken across grain into thin slices or shred (we preferred shredding for better portion control, easier sandwich compilation and better sauce distribution); keep warm.

Remove 2 tablespoons adobo sauce from can; set aside. Remove 2 chipotle chiles from can; finely chop and set aside. Reserve remaining chiles and adobo sauce for another use. (This step is unnecessary if you are using ground chipotle. The biggest advantage to using the ground is that it isn't as spicy as the canned chiles. Chipotle is quite hot and easily gets to be too much so be careful whichever way you go. Remember that you can always add more spice later but it is harder to take it away.)

Heat oil in a large nonstick skillet over medium-high heat. Add 1 tablespoon minced garlic; sauté 3 minutes or until just beginning to brown. Add 1 teaspoon cumin; sauté 1 minute. Stir in tomato puree; cook 4 minutes or until mixture thickens to a paste like consistency, stirring constantly. Stir in reserved 2 tablespoons adobo sauce, 2 chopped chipotle chiles, vinegar, honey, Worcestershire, and 1/4 teaspoon salt. Add sliced chicken to sauce; simmer for 3 minutes or until thoroughly heated.

Preheat broiler.

Split rolls in half; arrange in a single layer, cut sides up, on a baking sheet. Broil 1 minute or until lightly toasted. Remove top halves of rolls from baking sheet. Divide chicken mixture evenly among bottom halves of rolls, and top chicken mixture evenly with cheese. Broil chicken-topped rolls 2 minutes or until cheese melts. Remove from oven; top with onion and top roll halves. Serve immediately.

Jennifer Martinkus, Cooking Light
MAY 2005

*TIPS!*

~Surprisingly enough, all of my favorite store bought bread products come from Wal-mart. They have a great selection of different kinds of rolls that are really good and very reasonably priced. I got crusty sandwich rolls for our sandwich recipes this week and they were excellent.

~If you are wondering what a jar of Ground Chipotle Chile looks like this an example of what you should be keeping an eye out for in the store:


~Tomato puree is NOT tomato paste or tomato sauce. You can buy it in the store or you can buy a can of diced tomatoes, drain BUT RESERVE the juice from the tomatoes, and then blend the tomatoes in a blender or food processor. You want to reserve the juice in case your mix gets too thick later on and this will allow you to thin it out a bit. But DO NOT use tomato sauce or paste instead. 

Friday, July 15, 2011

Mediterranean Spring Bowls

This was a delicious dish that absolutely hit the spot. When you look at the recipe and start panicking about the amount of lemon and garlic it calls for.... take a deep breath and take my word for it - it isn't too much. But be forewarned - it ends up tasting quite strongly of garlic and you will want to cut back if you aren't a big fan.

The only thing that we changed was the amount of rice to rice mix ratio. We tried it out exactly the way the recipe says and decided it was just a little too strong so we added some more rice.

This recipe is definitely more labor intensive because of the amount of vegetables you have to cut up. But it is worth it. And it is a great, healthy dish that is perfect for a summer night. Next time I will probably leave out the beans - the texture just gets to me every time.

The picture and recipe are courtesy of Favorite Family Recipes and can be found at this site here: http://www.favfamilyrecipes.com/2011/06/mediterranean-spring-bowls.html

MEDITERRANEAN SPRING BOWLS
Adapted from Favorite Family Recipes

1 bottle Lawry’s (or any) lemon pepper marinade
2 chicken breast halves
lemon pepper
1 onion, diced
1 medium-sized zucchini, diced
1 green bell pepper, diced
1/2 c. garbanzo beans
12-15 cherry (or grape) tomatoes
feta cheese

For the rice:
1 1/3 c. long-grain, white rice
2 2/3 c. water
3 Tbsp. olive oil
juice of 2 lemons
1/2 tsp. lemon zest (or to taste)
4-5 cloves garlic, crushed (add more if you dare)
1/2 tsp. pepper
salt (to taste)

Marinate chicken breast halves in lemon pepper marinade for at least an hour (sealed tightly in a plastic Ziploc bag works best). Remove chicken and discard marinade. Place chicken in a 9x13 glass baking dish and sprinkle with lemon pepper on both sides. Bake at 350-degrees for about 35 min or until juices run clear and chicken is completely cooked through. While chicken is cooking, heat a little bit of oil in a large skillet. Add diced onion, zucchini, bell pepper, and garbanzo beans. Saute until onions become clear. Add tomatoes and saute an additional minute or so until tomatoes become hot.

Chop up cooked chicken into smaller pieces (at the restaurant they cut up the chicken into little cubes.. I would normally do that too but for the sake of a prettier picture I cut the chicken into strips) and stir in with sauteed veggies.

For the rice:
Cook rice with water according to package instructions (or in a rice cooker). After the rice is cooked, combine remaining ingredients (from olive oil on...) and pour slowly over rice while fluffing with a fork. Add more lemon juice a little at a time if needed.

Put a scoop or two of rice on a plate (or in a bowl). Add sauteed veggies and chicken (at White House Grill, they just kind of toss everything together and put it over the rice, I know the picture above is more layered.. I just did that because I thought it looked prettier.. it all tastes the same..) Top each bowl with about 2 Tbsp. feta cheese (or to taste).

Thursday, July 14, 2011

Pepperoncini Beef Sandwiches

OH.MY.YUM!!!! I must say that even writing about these sandwiches is making me want to make them again for dinner tonight even though we just had them. This recipe is so easy to make with so few ingredients that it is almost a crime that it is also SOOO good. I honestly can't wait to make this one again. I have another roast in my freezer waiting to be used for a different recipe but I may just have to postpone that one and have some more of these delicious sandwiches!

If you are afraid of the spice factor here you really shouldn't be (unless you are a major spice wimp). Pepperoncinis are mild peppers and the flavor is more tangy than spicy. This is the spice label on the pepperoncini bottle:


The pictures and recipe are courtesy of Our Best Bites (LOVE THEM!) and can be found at this site here: http://www.ourbestbites.com/2011/06/pepperoncini-beef-sandwiches/

 Pepperoncini Beef Sandwiches
Recipe adapted by Our Best Bites from Allrecipes

1/2+ tsp. kosher salt (you really could use normal salt...)
1/2+ tsp. freshly ground black pepper
2 tablespoons of olive or cooking oil
3 lb. beef roast, trimmed of excess fat
4-5 cloves garlic, minced or pressed
1 16-oz. jar sliced pepperoncinis, undrained
Crusty sandwich rolls (for sandwiches)
Sliced provolone cheese (for sandwiches)

Heat oil in a pot or high-sided skillet over high heat. While the oil is heating, combine the salt and pepper and rub it into the meat. Add more if necessary. When the oil is hot, sear the roast on all sides so the outsides of it is browned and a little crispy. Transfer the roast to a slow cooker and add the minced garlic and the entire jar of pepperoncinis. If possible, cook on high until the liquid comes to a boil and then turn it to low and cook until the roast shreds easily with a fork, for a total cooking time of about 6-8 hours. If not possible, cook on low for 8-10 hours or until the beef is fork tender. 

For sandwiches, slice the rolls and spread lightly with mayonnaise and then top with the shredded beef. Add a slice of provolone cheese and then place under the broiler for 1-3 minutes or until the bread is toasted and the cheese is melted. Serve immediately. Makes 12 large sandwiches.

TIPS!
*In our slow cooker we cooked our FOUR pound roast on high for 1 hour and then on low for 5 hours. It was PERFECT in tenderness and shred-ability. Make sure you experiment with the cooking time to find out what works best for your slow cooker - unfortunately they are all a bit different.

*I would recommend toasting the rolls first all by themselves. Then place mayo, beef and cheese on one side and set the other half to the side. Broil until the cheese is melted. If you do it this way you will have 2 toasty sides instead of one toasty side and one soggier side.

Tuesday, July 12, 2011

Fettuccine with Sweet Pepper Cayenne Sauce, Meatless

There is precious little that I enjoy eating more than a well made pasta dish. What is it about pasta? It is so delicious and so comforting! And one week after having a baby that is exactly the kind of food I am looking for! The kidlets and I are spending our days at my parent's house right now to help me get adjusted to being a mother of 2 so I can't take credit for making this dish. Basically I bring the ingredients that I bought intending to make these dishes before my baby came a week earlier than expected and my mom throws it together! Great arrangement, no?

This pasta dish is very creamy with a slight kick to it. We "one-and-a-half-times"d this recipe and left the amount of cayenne pepper originally called for the same. If you want to be adventurous you are welcome to be but it really is good with just a subtle kick to it instead of a left hook to the mouth.

The original recipe is courtesy of Allrecipes.com and can be found at this site here: http://allrecipes.com/recipe/fettuccine-with-sweet-pepper-cayenne-sauce/photo-gallery.aspx?Page=2

The picture is courtesy of Dough See Dough and can be found at this site here: http://doughseedough.net/2009/07/05/fettuccine-with-sweet-pepper-cayenne-sauce/

FETTUCCINE WITH SWEET PEPPER CAYENNE SAUCE
From Allrecipes.com
REMINDER RECIPE! One Year Ago: Chicken Stir Fry Wraps (click on the "C" of chicken)
REMINDER RECIPE! Two Years Ago: Sticky Fingers like Wingers! (click on the "S" of sticky)

  • 12 ounces dry fettuccine pasta
  • 2 red bell peppers, julienned
  • 3 cloves garlic, minced
  • 1/2 - 3/4 teaspoon cayenne pepper
  • 1 cup reduced fat sour cream
  • 3/4 cup chicken broth
  • 3/4 cup grated Parmesan cheese
  • salt and pepper to taste
  1. Bring a large pot of lightly salted water to a boil. Add pasta and cook for 8 to 10 minutes or until al dente; drain.
  2. Meanwhile, spray cooking oil in a large skillet and saute red bell peppers, garlic and cayenne pepper over medium heat for 3 to 5 minutes.
  3. Stir in sour cream and broth; simmer uncovered for 5 minutes. Remove from heat and stir in cheese.
  4. Toss hot pasta with sauce and season with salt and pepper to taste; serve.