About Me

My photo
Who am I? Wife. Mother of 2. "Newbie" to fitness. Personal Trainer-in-training. Lover of health. Fitness. Religion. Family. Gluten and refined sugar intolerant. Welcome to my journey. Learn with me.
Showing posts with label Pizza. Show all posts

Sunday, February 24, 2013

Supper-Time Sunday!

This week contributed some very tasty eats to our pallets and I am excited to share these gems with you!

MAPLE LEMON SKIRT STEAK
Recipe + Photo Courtesy of Prevention.com

We don't eat a whole lot of beef around here so it is always kind of a special treat when we do. Plus, petite sirloin was on sale this week so that is just an amazing excuse to pull out one of my beef pins to try out. I have never heard of skirt steak so if any of you have... enlighten me!

I also don't know why they call it petite sirloin - these babies were huge! I sliced mine in half BOTH ways and they cooked up quickly. Besides the baked potatoes that I served on the side of this the whole meal came together in a half hour. I also served it with roasted red and green peppers and yellow onion. Very delicious.

We particularly liked the sauce which I didn't change anything about. It is a bit on the sweeter side of things with a tiny bit of a kick from the dijon mustard. Cute hubster loved it.

___________________________________
SWEET POTATO-PEANUT BISQUE
Recipe + Picture Courtesy of Eating Well

Not kidding, this is one of my new favorite soups. Now, granted, I am not much of a soup person. Maybe that is more comforting to you because I am really picky about the soups that I like. But we loved this. I will admit that I balked at the recipe list... when you look at it it just doesn't seem possible that it would all come together but it does and it just... works!

I thought that this soup was extra tasty fresh but it is still quite good as leftovers. And it is filling too. One bowl was plenty for me to feel satisfied 

The only changes that I made to the recipe were that I used olive oil instead of canola, we used the tomato-vegetable juice blend, and we didn't garnish with cilantro. Cute hubster doesn't like cilantro so I leave it out when it is optional. 

__________________________________
CAULIFLOWER CRUST PIZZA
Recipe + Photo courtesy of Beth at Eat.Drink.Smile.

UPDATE!!!

This week I made this crust again for our pizza eats on Monday. 

I used ~3 cups riced, cooked cauliflower (1 large cauliflower worth), 1 1/2 cups part skim mozzarella, 3 whole eggs, 1 tbsp minced garlic, 3 tbsp nutritional yeast, and 3 tbsp ground flaxseed. I oiled my pan and spread the whole thing on a cookie sheet and baked for about 17 minutes. I then proceeded to top the pizza and cook for 5 minutes more. 

It was FABULOUS! Best time we have had it yet with the best texture. And this way you can do a whole pizza and have the family separate it out into individual sections instead of having to do little pizzas individually. 

_______________________________

QUESTION FOR MY DEAR READERS: Have you made anything delicious this week that you can share with me? I LOVE getting new ideas! I am particularly looking for a single serve pizza crust that you can cook in a frying pan and is gluten free... too much to ask? 

Loves...Shayla

Sunday, August 26, 2012

Supper-Time Sunday!

Homemade Ketchup
Rating: A
I have a hard time with ketchup because it almost always has high fructose corn syrup in it. Since I react badly to HFCS I usually just avoid ketchup altogether; however, I have some recipes that call for ketchup and wanted to have an option. Now I know that they make ketchup without HFCS but I wanted to try my hand at making my own. It was surprisingly easy and I had all of the ingredients on hand. It was really tasty too. I even omitted the extra tsp of sugar and just went with the agave/honey. I didn't think it made very much so I will probably double or triple the recipe next time around but I would definitely like to make it again!

One Minute Paleo Flax Muffin
Rating: F
I'm sorry... I have made microwave flax muffins before that I liked but this one was terrible. The bread part had an awful flavor and called for WAY too much flax seed. I tried to stir it really well before baking and still had a bunch of leftover flax at the bottom of my cup. I will definitely NOT be making this recipe again. Maybe you will have better luck?

Egg White Crust
Rating: A
I have made this recipe twice now in two different ways. I have no egg protein on hand so the first time I just used whole wheat flour and flax seed. I mixed it up with some garlic and italian spices and topped it with hummus, cottage cheese and a bunch of veggies. VERY delicious! The second time I used my vanilla whey protein powder in place of the egg protein and topped it with cottage cheese, mashed blueberries and peach slices. ALSO very delicious! This recipe is a keeper for sure.

Healthy Homemade Graham Crackers
Rating: B-
These were fun to make but I probably wouldn't make them again. They aren't the easiest things in the world to put together and they aren't as tasty as boxed grahams. Now, I think that this can be easily fixed with a few tweaks - you can up the amount of sugar that it calls for or add other things to it like cocoa. When you cook it make sure to not overcook. I overcooked one batch and they crumbled like crazy. The second batch was much softer and tastier, especially with milk, but still lacking in something. Also, make sure you roll out the dough REALLY thin because they do rise in the oven and my second batch was more like soft cookies than crunchy grahams. Good luck if you try it!

Quinoa Fruit Parfait
Rating: B+
This was a tasty idea and I loved the cinnamon/vanilla/greek yogurt layer. I actually made mine with raw oatmeal and cooked oatmeal for my mom and sister. I haven't tried the quinoa but I would be willing to. It isn't the best thing that I have ever had but it was decent.

Wednesday, May 16, 2012

Baja Chicken Pizza

This recipe is a combination of a few recipes that I have on here with something new! I hope you have been following along but if not I will update you:

This is the crust: Jay's Signature Pizza Crust - Healthier!

This is the ranch used to make the sauce: Greek Yogurt Ranch Dressing

And this is the chicken that I used instead of what is called for in the recipe: Slow Cooker Cilantro Lime Chicken

And if you want to know how amazingly good this pizza turned out... my husband and his best friend, Mike, were over for dinner. They both DEVOURED this thing. Seriously. I made enough to fill an 11x17 inch cookie sheet and there was not a single crumb left. It was fresh and delicious and pretty incredibly healthy for a pizza!

I doubled the sauce recipe because I was making a really big pizza but I don't think I had to. However, this sauce is amazing for dipping crust in or for eating with a salad. Delicious low fat salad dressing too? This recipe is AMAZING!!!!

I will list the original recipe here in case you don't have leftover chicken like I did. But trust me, make the chicken for one dinner and then have this with the leftovers the next day - you WILL NOT regret it!

This recipe is courtesy of Blog Chef and can be found at this site HERE.


BAJA CHICKEN PIZZA
Adapted from Blog Chef


½ cup ranch salad dressing (I used the Greek Yogurt dressing)
1/8 cup salsa
½ tablespoon lime juice
1 ½ tablespoons cilantro
2 boneless skinless chicken breasts (or replace with leftover Cilantro Lime Chicken)
1 (1.25 ounce) envelope taco seasoning (not needed if replacing chicken)
1 prebaked 12-inch pizza crust (or make your own healthier (and cheaper) crust)
½ cup tomato (chopped)
½ cup red onion (chopped)
2 cups shredded Mexican cheese blend (I probably used this much for my huge pizza - it doesn't need this much if you are making the smaller 12-inch pizza crust. I would say 1 cup at most for the smaller crust.)
2 cups shredded lettuce
2 medium ripe avocados (peeled and thinly sliced)

Step 1:
 Pre-heat the oven to 350 degrees. Rub chicken breasts on both sides with taco seasoning and place onto a lightly greased baking sheet. Place into the oven and bake at 350 degrees for 30 minutes or until the chicken breasts are fully cooked (the internal temperature has reached 165 degrees). Remove from the oven, allow the chicken to cool for 10 minutes and slice into strips.  In a blender or food processor add ranch dressing, salsa, lime juice and cilantro. Cover and process until smooth (this can also be done by hand, by whisking in a bowl). Set aside.
Step 2: Turn the oven up to 425 degrees. Place the pre-baked crust onto a 12-inch pizza pan. Spread the ranch dressing mixture evenly over the crust. Sprinkle with the sliced cooked chicken, tomato, onion, and cheese.
Step 3: Place into the oven and bake at 425 degrees for 17-20 minutes or until the crust is golden brown and the cheese has melted. Let stand 10 minutes before cutting. Sprinkle with lettuce and top with avocado slices. Serve immediately.
(Makes 4 Servings)

Friday, May 4, 2012

Chicken Picante Pizzas

Okay so you remember the Slow Cooker Black Bean Enchiladas that I have had on the menu for weeks? Yeah... they are not happening. I actually went to make them the other night and realized that my green pepper was bad. So I had my hubby make this meal instead while I worked. I loved them so much that I made them again last night and now we are out of tortillas for the week!

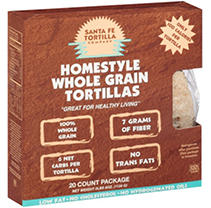
These were really delicious. Easy to put together  and very filling and satisfying. We used whole wheat tortillas for ours. My favorite brand is the Sante Fe Mission Homestyle Whole Wheat Tortillas. They have only 100 calories for a whole tortilla and they are chewy and delicious. They come in a package that looks like this:

(Source: HERE)

And guess what? The ENTIRE "pizza" comes in at only 280 calories. Wow. And if you don't like the toppings listed? Fine, use what you like. My friend has made this recipe with all kinds of different toppings and I am excited to try some other variations. With a crust that is this quick and easy? Why not!

This recipe is courtesy of Campbell's Kitchen and can be found at this site HERE.

CHICKEN PICANTE PIZZAS
From Campbell’s Kitchen
Servings 6

Nutritional Information per serving (calculated on MyFitnessPal.com): Calories 280, Carbs 21, Fat grams 12, Protein 28 (Calculated based on whole wheat flour tortillas)

6 flour tortillas (8-inch)
Vegetable cooking spray
1 jar (16 ounces) Pace® Picante Sauce
1 1/2 cups cubed cooked chicken
1 1/2 cups shredded Monterey Jack cheese (about 6 ounces)
3 green onions, sliced (about 6 tablespoons)

1.                  Heat the oven to 450°F.  Place the tortillas onto 2 baking sheets. Spray the tortillas with the cooking spray. Bake for 5 minutes or until the tortillas are golden.
2.                  Spread about 1/4 cup picante sauce onto each tortilla to within 1/2 inch of the edge. Top with the chicken, cheese and onions.
3.                  Bake for 5 minutes or until the cheese is melted.

*We made our pizzas completely on the barbecue. You grill up your chicken until it is ready and set it aside to rest for a minute. Place your tortillas in a single layer DIRECTLY on the bottom of your barbecue on low heat for just 30 seconds to 1 minute. You do NOT want to burn them, just get them a little bit warm and crunchy. Place a layer of aluminum foil on the top rack of your barbecue and flip the tortillas over so that the crispy side is on the top. Place your ingredients on top (hopefully you sliced the chicken by now or had your adoring husband do it) and close the barbecue. You can turn the heat up to medium and just cook until the cheese melts. Try to avoid opening the barbecue as much as possible but check the bottom of your tortillas occasionally to make sure they aren't burning. Slide off onto a plate - yummy!!!

Monday, October 24, 2011

Roasted Vegetable & Ham Pizza Roll

OH.MY.YUMMMM!!!!!!! I love love love love love this meal. We have already had this meal again since I originally made it even though it is definitely more labor intensive. But it is divine and well worth every effort. Roasted broccoli is one of my favorite things in the world and pairing it with roasted red peppers is inspirational. I wish I had step-by-step pictures for you of this one because the description can be a bit confusing but bear with me, I will explain as best as I can and if you have questions you can feel free to ask!

Oh, and don't think you have to do broccoli and red peppers. You can do whatever veggies you want on the inside of this thing. And if you want to make it meatless just add an additonal veggie and get rid of the ham.

The original inspiration for this recipe came from Mindika Moments but it has been largely adapted. If you would like to see the original post you can find it at this site here: http://www.mindikamoments.com/2009/10/ive-been-experimenting.html

Roasted vegetable & Ham pizza ROLL
Largely Adapted from Mindika Moments Veggie Bread Roll

1 recipe for pizza dough (Jay's Signature Pizza Crust is the best)
4 oz. cream cheese (I used fat free), at room temperature
¼ C. sour cream (I used fat free)
1 t. dry ranch dressing mix powder
1 head of broccoli, trimmed to small pieces with stems mostly cut off
1 red pepper, cut into small slices
1 lb. deli honey ham slices
¼ - ½ C. grated Parmesan
 2 Tbsp Olive Oil

¼ tsp. EACH salt & pepper
1 egg white

Sesame seeds

1. Preheat oven to 400 degrees.

2. Make up pizza dough to the first rising. Towards the end of your dough rising, prepare your veggies and toss with olive oil and salt and pepper. Place on a baking sheet and roast in the oven for 15 - 20 minutes. You want them to start turning dark but not to burn.
3. When pizza dough is finished rising, roll out according to recipe directions. (Mine says to deflate, roll into a tight ball, let it sit for a minute and THEN roll it out.) Spray counter with nonstick cooking spray and roll dough out to approximately 16” wide by 17” long. (This will make it the same size as a cookie sheet length wise but make it longer than the cookie sheet on the top and bottom.) Transfer to a baking sheet. The dough SHOULD hang over the sides a bit on the top and bottom. (You may need someone to help you with the transfer.)
4. Cover the dough lightly with a large cloth and let it rise for 15-20 minutes.
5. Turn up the oven to 425 degrees. (Or whatever temperature your pizza dough is supposed to bake at.)
5. While dough is rising, mix together cream cheese, sour cream and dry ranch mix in a small bowl. When the dough has finished rising, spread cream cheese mixture evenly through the middle leaving about 3 – 4 inches on each side. Top with ham slices and the roasted veggies.
6. Make small cuts in each side of the dough about 1 ½ - 2 inches wide all along the width of the pan. (This is really easy to do with normal scissors, just make sure they are clean.) Criss-cross the strips of dough over the ham and veggies, being careful not to tear your strips. It is almost like you are "braiding" the dough over the inside ingredients.
7. Beat 1 egg white in a small bowl just slightly. Brush egg white over the top of your braided pizza roll. Sprinkle with sesame seeds and parmesan cheese.
8. Bake roll in oven for 15 – 20 minutes until the crust and parmesan cheese are golden brown.
9. Serve dipped in additional ranch dressing, if you desire. (I didn’t, my husband did. J)


Monday, October 17, 2011

Jay's Signature Pizza Crust

I posted a while ago about Breadsticks and pizza dough recipe that I got from Our Best Bites that was pretty good. I have to say though, this recipe is much better. It is very tasty and bakes up beautifully. And my favorite part is that it doesn't taste so yeasty. It is so easy to make and makes 1 GIANT pizza crust. If you are interested in only 1 good sized pizza I would cut this recipe in half.

The picture is of a Roasted Vegetable & Ham Pizza Roll I made with this crust recipe. I will post about that recipe in a few days. :-)

The recipe is courtesy of Allrecipes.com and can be found at this site here: http://allrecipes.com/recipe/jays-signature-pizza-crust/detail.aspx

JAY’S SIGNATURE PIZZA CRUST
From Allrecipes.com

·         2 1/4 teaspoons active dry yeast
·         1/2 teaspoon brown sugar
·         1 1/2 cups warm water (110 degrees F/45 degrees C)
·         1 teaspoon salt
·         2 tablespoons olive oil (I usually use half oil, half applesauce)
·         3 1/3 cups all-purpose flour

1.      In a large bowl, dissolve the yeast and brown sugar in the water, and let sit for 10 minutes.
2.      Stir the salt and oil into the yeast solution. Mix in 2 1/2 cups of the flour.
3.      Turn dough out onto a clean, well floured surface, and knead in more flour until the dough is no longer sticky. Place the dough into a well oiled bowl, and cover with a cloth. Let the dough rise until double; this should take about 1 hour. Punch down the dough, and form a tight ball. Allow the dough to relax for a minute before rolling out. Use for your favorite pizza recipe.
4.      Preheat oven to 425 degrees F (220 degrees C). If you are baking the dough on a pizza stone, you may place your toppings on the dough, and bake immediately. If you are baking your pizza in a pan, lightly oil the pan, and let the dough rise for 15 or 20 minutes before topping and baking it.
5.      Bake pizza in preheated oven, until the cheese and crust are golden brown, about 15 to 20 minutes.

Thursday, September 8, 2011

Pizza Crust

I found this fun tutorial on OurBestBites.com for pizza. I love making homemade pizza but I still want it to taste like we bought it. Little did I know that there are some secrets to making the crust that you need to remember.  Go on over to OurBestBites and check out this tutorial! The picture on this post is also from that same linked site.

What worked for me:

1. I have a pizza stone to cook my pizza on. If you don't have one, get one! They are amazing.
2. I did NOT preheat my stone. The one time I tried this my crust turned out much too crispy.
3. I did NOT roll out my dough and THEN try to move it to the stone. I rolled it right on the stone. This is hard to accomplish without someone holding the stone in place but it is so much easier to get the crust perfectly round.
4. I did prick my crust with a fork before baking and I did brush it with olive oil and I did sprinkle it with Johnny's Garlic Seasoning. I tried it once without the garlic seasoning and it made such a huge difference in the taste that I will not go without it again. (Unless I am making a dessert pizza...)
5. I did pre-cook my crust, but not for 10 minutes. Watch it carefully in the oven. As soon as it starts to turn brown take it out and put your toppings on. If you want it crispier you can leave it in longer but taking it out sooner gives it a crunchy outside with a chewy inside.
6. I used the same dough recipe as I did for the Breadsticks I made last month. It was pretty good but not fabulous. I think next time I will make Jay's Signature Pizza Crust from Allrecipes.com

Thursday, March 3, 2011

Chicken Enchilada Pizzas

This is another easy and fantastic recipe that I found on The Sister's Cafe. This was the perfect blend of flavors and my entire family (my parents, brothers, and sister included) absolutely loved it. My dad said it was one of the best things I have ever made and I think Jake had 4 or 5 helpings! Don't pass this recipe by - it is definitely a keeper! I have listed the original recipe here but please take note of my changes at the bottom.

CHICKEN ENCHILADA PIZZAS
Submitted by Erin ~ The Sisters Cafe

4 flour tortillas (8-10 inches in diameter)
1 T. vegetable oil
1 medium onion, thinly sliced
2 c. chopped cooked chicken breast
½ c. green salsa (salsa verde)
1 can (2 ¼ oz) sliced ripe olives, drained
1/3 c. sour cream
1 c. shredded Monterey Jack cheese (4 oz)
1 large tomato, chopped (optional)
Chopped fresh cilantro

Heat oven to 400°. Place tortillas on ungreased cookie sheet. Bake about 5 minutes or until crisp.

While tortillas are baking, heat oil in 10-inch nonstick skillet over medium heat. Cook onion in oil, stirring frequently, until tender; remove from heat. Stir in chicken, salsa, and olives.

Spread sour cream on tortillas. Top with chicken mixture, chopped tomatoes if desired, and cheese. Bake 5 to 6 minutes, or until cheese is melted. Sprinkle with chopped fresh cilantro.

*My Changes: 1/2 cup salsa verde is NOT enough. We doubled the recipe and used an entire bottle (close to 1 3/4 cup.) Start with 1/2 cup and add more salsa as the consistency of chicken mixture fits your tastes.

The Monterey cheese is, I am sure, delicious - but not necessary. We used a mixture of cheddar and mozzarella and it turned out great.

We used 1 can of sliced olives for doubling the recipe. Once again, just watch carefully before dumping the ingredients in so you make sure you get the amount you want.

We did not sprinkle the top with chopped fresh cilantro but mixed it into the chicken mixture. This makes it much easier to eat and very delicious!

Thursday, January 6, 2011

New Year's Recipes

My mom and I made a bunch of things for our New Year's Eve celebration and they were all delicious! We were so full and I was wishing I could have a couple of extra stomachs for the night. My favorite recipe was the Greek 7 layer dip. We are huge Greek food fans at our house and it hit the spot perfectly! Thanks to Our Best Bites for the recipes and pictures. Please visit their fabulous site by going here.
7-LAYER GREEK DIP

Adapted by Our Best Bites from the Better Homes and Gardens New Cookbook

1 8-oz. package cream cheese, softened (I used low-fat)
1 tsp. dill weed or Greek seasoning (salt free--go for a mix that just has herbs)
3 cloves garlic, minced or pressed
2 tsp. lemon juice
1 1/2 c. hummus
1 c. seeded, diced cucumbers
1 c. seeded, diced tomatoes
1/2 c. chopped Kalamata olives
1/3 c. chopped green onions (about 3 green onions completely chopped)
1/2 c. crumbled Feta cheese
1/8-1/4 c. minced fresh parsley

With an electric mixer, combine the cream cheese, seasoning, garlic, and lemon juice until light and fluffy. Spread in the bottom of a pie plate or a small, shallow baking dish. Then spread a layer of hummus. In order, create layers by sprinkling the cucumbers, tomatoes, olives, onions, Feta cheese, and parsley. Cover with plastic wrap and chill for at least 2 hours. Serve with pita chips, fresh vegetables, and/or flatbread.

CHEESY ROASTED RED PEPPER DIP


7oz jar roasted red peppers (about 1C diced)
4 C grated pepper jack cheese (3/4 lb)
8oz cream cheese (I use low-fat)
3/4 C mayonnaise
2 T minced onion
3 cloves garlic, minced
1 T Dijon mustard

Preheat oven to 350. Remove peppers from jar and blot excess water with paper towels. You want to make sure they are dry so they don't add moisture to the dip. Then dice 'em up.

In a bowl, soften cream cheese in microwave so it will be easier to stir. Add in mayo, onion, garlic, and dijon. Stir to combine and then add in grated cheese and the diced peppers. Place in an 8x8-ish dish (pie plate works). At this point you can pop it in the fridge if you're going to cook it later and you can even make it a couple of days ahead of time. Place in the oven and cook for 30-45 minutes. Baking time depends on the dish. It will start to bubble and brown on the outside edge, and you want it to be bubbly all the way through to the center. It will be nice and golden brown on top, especially around the edges. Mine usually takes 40-45 min.

CHICKEN-BACON STUFFED PIZZA ROLLS

recipe by ourbestbites.com

1 roll refrigerated pizza dough (make sure it is big!)
1 packet Hidden Valley Ranch Dressing mix
2 T grated Parmesan cheese
1 T olive oil or melted butter
sharp cheddar cheese (I used a 50/50 mix of mozzarella and cheddar)
8 slices bacon, cooked and crumbled
about 1 C shredded, cooked chicken.
3/4 C mayo
3/4 C milk

First take 1 teaspoon of your ranch dressing mix and combine it with 1 1/2 T parmesan cheese. Set aside. Combine the remaining ranch mix with 3/4 C mayo and 3/4 C milk and place in the fridge to chill.

Preheat oven to heat specified on pizza dough package. Usually it's 400-425 degrees.

Unroll your pizza dough onto a lightly floured surface. Pat or roll the dough so it's about 12" by 8". You're going to want to cut it into 24 squares, so just eyeball it if you need to. Use a pizza cutter to slice the dough into 24 squares.

Place cheese and desired toppings on each square.

When all of your dough squares have cheese and toppings on them, carefully lift up each square and wrap the dough around the toppings.

I grab the four corners first and then squeeze the seams shut. Then place them seam side down in a lightly sprayed pie pan (or similar sized dish). Brush with melted butter or olive oil and sprinkle with the parmesan-ranch mixture.

Place your rolls in the oven. I've noticed baking time really depends on the type of dough I'm using. Whether it's different brands from the store, or homemade dough, they all take different amounts of time. Set your timer for 10 minutes and check on them after that. They may take up to 15 or 20 to be done. Take them out when they're lightly golden on top.

Serve them warm with a side of freshly made ranch dressing for dipping.

Note:
These can also be baked individually in a mini-muffin tin. This might work better for serving depending on the situation. You're making 24 rolls, so it fills up the pan perfectly. They cook quicker this way than in a pie pan so keep an eye on them. Mine only took about 8 minutes whereas the ones in the pan took about 13-15.

Wednesday, November 3, 2010

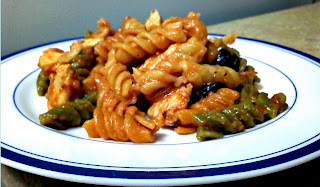
Pepperoni Pizza Chicken Pasta

I got the idea for this recipe from a recipe I saw on Betty Crocker. I wasn't sure my family would've liked the style of cooking that particular recipe called for because my husband isn't a big chicken fan... he will always eat it but he prefers it in smaller pieces and the Betty Crocker recipe called for the chicken to be in full breasts. So this is my version of the recipe. And it turned out great! Very flavorful and, although probably not the most healthy meal, very fun and easy!

PEPPERONI PIZZA CHICKEN PASTA

3 chicken breasts, cut up into cubes
1/2 cup pepperoni slices, sliced
1/4 red onion, sliced
1/2 can olives, sliced
12 - 16 oz. pasta (I used garden rotini)
1 large can of any pasta sauce you prefer
2 tsp minced garlic
1 Tbsp olive oil

In a 12-inch skillet, heat the oil. Place the garlic, onion, chicken, and pepperoni in the skillet and cook until chicken is no longer pink. In the meantime, cook pasta according to package directions; drain and return to pot. Once chicken is cooked place spaghetti sauce in skillet and heat thoroughly. Add sauce and olives to pot with noodles and mix thoroughly. Top with cheddar cheese or parmesan as desired.

Saturday, October 2, 2010

Deep-Dish Taco Pizza

We love Mexican food around here (surprise, surprise...) and this one was a huge hit! Pretty versatile too. I added some things to add more substance and I am really glad that I did. It made the Pizza almost impossible to eat without a fork but I felt like it made it more filling and "better" for you. This definitely isn't the most healthy meal you will encounter, but it was such a big hit with everyone. We were watching our niece, Serenthia, and she ate almost an entire piece by herself (12 months old)! Abrielle couldn't get enough of it either and Jake was raving about it. Try this one. You will really like it! The recipe below is my modified recipe. If you would like to see the original please visit the wonderful site http://threeonfood.blogspot.com/.

DEEP-DISH TACO PIZZA
From Three on Food

1 lb. hamburger meat
1/2 cup chopped onion
2 (15 oz.) cans Rotel, drained
1 pkg. Taco seasoning
1 cup frozen corn, rinsed
1 can medium olives, sliced
2 (10 oz.) cans refrigerated pizza crust dough (for a thinner crust use just 1)
2 cups shredded sharp Cheddar (We used 1/2 cup cheddar and 1 1/2 cups Monterey Jack because that is what we had!)
Salsa (optional)
sour cream (optional)

Preheat oven to 425°. Cook beef and onion in a large nonstick skillet over medium-high heat until beef is browned, stirring to crumble. Drain well, and return beef mixture to pan. Stir in rotel, corn and taco seasoning; cook over medium-high heat 1 minute or until thoroughly heated; set aside. Unroll pizza crust dough. Press into bottom and halfway up sides of a 13 x 9-inch baking dish coated with cooking spray. Spoon beef mixture over pizza crust dough and top with olives. Bake at 425° for 12 minutes. Top with cheese, and bake 5 minutes or until cheese melts and edges of crust are browned. Let stand 5 minutes before slicing. Serve warm. Top with salsa and sour cream, if desired.

Thursday, August 19, 2010

Pizza Casserole

We had something else planned for dinner tonight but I thought pasta sounded good and Jake was craving spaghetti. I had all of the simple and mostly basic ingredients for this recipe on hand and I am so glad that I did! It was cheesy and delicious, substantial and hit the spot! Healthy? No... but then, when do you eat pizza to be healthy? But it really is good and is sure to be a hit. Jake loved it and is really excited to take the leftovers for lunch. The original recipe doesn't call for olives but I feel it is a must add. And really, you could add whatever toppings you wanted: green peppers, tomatoes, mushrooms. This was a lot like my Meat Lover's Lasagna! Yummy! The recipe is courtesy of Blog Chef and can be found here.

PIZZA CASSEROLE

From Blog Chef

Ingredients:
1 lb ground beef
1/2 large onion (chopped)
1/2 clove garlic (minced)
1/2 teaspoon Italian seasoning
1 tablespoon olive oil
1 (26 ounce) jar spaghetti sauce
8 ounces rotini pasta, (cooked and drained)
2 1/2 cups shredded mozzarella cheese (20 oz)
4 ounces sliced pepperoni
½ can olives, sliced

Step 1: Pre-heat the oven to 350 degrees. In a large skillet add oil and heat to medium-high heat. Add ground beef, onion, and garlic. Add Italian seasoning. Cook until the beef is browned. Drain.

Step 2: Stir in pasta, sauce and 1 1/2 cups of cheese into the meat mixture. Place mixture into a greased 9×13” baking dishes. Sprinkle with the remaining mozzarella cheese and top with pepperoni and olives.

*The dish can be covered and frozen as this point if you are freezing.

Step 3: If you are cooking it now- Bake in the oven at 350 degrees for 25-30 minutes.

(Makes 7 servings)

Friday, July 16, 2010

Classic Repeat - Bubble Pizza with a TWIST

We did this a new way tonight and I really liked it! I had planned on making this recipe but when it came time to get to dinner pepperoni was about the last thing I wanted. I was craving tacos (go figure) so we did a Mexican spin on the recipe! The recipe below includes all of my changes. If you want the original recipe go here. The picture is courtesy of Flickr from Yahoo and can be found here.

BUBBLE PIZZA


1 lb. ground beef
1 taco seasoning packet
1 cup frozen corn
1/2 cup salsa
2 cups cheddar cheese
2 tubes buttermilk biscuits

Lettuce, sour cream, more salsa, or anything else you like on tacos.

1. Open the two tubes of biscuits and cut the individual biscuits into quarters. Place in bowl and set aside.
2. Brown ground beef; drain. Add taco seasoning and water according to package direction.
3. Stir in salsa with biscuits being sure to coat all of the pieces.
3. Add meat and frozen corn, NOT CHEESE. Mix well.
4. Pour mixture into a GREASED 9x13 pan (Pyrex is best).
5. Cook at 350 degrees for 20 minutes.
6. Remove and sprinkle cheese over the top. You may not need all two cups (we didn't).
7. Bake another 10 minutes. Remove from oven and let cool. Serve with additional toppings.

Tuesday, April 20, 2010

Meat-Lover's Supreme Lasagna

Healthy? HA HA HA HA! No. Delicious? OHHHHHH YES!!!!!!!!!!!!!!! This turned out FANTASTICALLY. We are huge fans of supreme pizza at our house and this was a great variation. It requires more ingredients than I would usually post about, but it is WELL worth it. Sprinkle it with a bit of red pepper to finish it off and OHHH MAN! Honestly, if you don't like supreme pizza you could adapt this to pretty much any kind of pizza. I am tempted to try pineapple and canadian bacon. Yum!

MEAT-LOVER’S SUPREME LASAGNA
Shayla Original

10 lasagna noodles, cooked
1 large can/jar favorite marinara sauce
20 slices pepperoni
1 lb. ground beef, browned
6 slices precooked bacon, cut into small pieces
½ green pepper, sliced
½ red onion, sliced
1 can medium olives, sliced
Cheddar Cheese, shredded
Parmesan Cheese, grated

Cook lasagna noodles according to directions on box; drain. In the meantime, brown ground beef and drain. Put a little bit of the marinara sauce on the bottom of a 9x13 dish so noodles won’t stick. Layer half of: noodles, ground beef, bacon, pepperoni, green peppers, onions, olives, sauce, cheddar cheese, and parmesan cheese; repeat once more with all layers. Cook uncovered at 350 for 30 minutes.

*NOTE: Just sprinkle the cheeses on to your personal preference, there isn't an exact measurement.

Wednesday, March 3, 2010

BBQ Chicken Pizza

This picture is not the pizza I made. It was gone too fast to take a picture of, plus I was not at home when I made this pizza. The picture is what inspired our creation, is courtesy of Allrecipes.com, and can be found here.

My sister and I spend Wednesday evenings together while our husbands are at work and school. Her husband doesn't like very many things (no creams, for example) so I have had to expand my recipes to fit his taste buds. I had a premade pizza crust sitting in my pantry and so we decided to put together our own BBQ Chicken Pizza. If you are like us, you don't want to spend the money to get specialty cheeses a lot of the time - and gouda fits under the category of a specialty cheese. This was our simple version of a FANTASTIC BBQ Chicken pizza, invented by us. It was super good and was a huge hit with the husbands! Took less than a half hour from start to finish!

BBQ CHICKEN PIZZA

2 chicken breasts, cut into small strips
¼ cup + 2 TBSP Favorite BBQ Sauce (I used Sweet Baby Ray’s)
½ - ¾ red pepper, sliced into thin strips
3 green onions, sliced
2 cups American cheese
1 premade pizza crust

In a large frying pan, heat oil on medium high heat. Add chicken pieces. Saute until cooked (about 6 minutes). Remove from heat and mix in a bowl with 2 T barbecue sauce. Set aside.

Spread ¼ cup barbecue sauce on surface of premade pizza crust. Distribute cheese over the sauce and the chicken over the cheese. Place pepper strips and green onions over the chicken pieces. Top with a little bit more cheese.

Bake at 450 for 8 – 10 minutes.

Sunday, February 14, 2010

Breakfast Pizza

We just love breakfast foods around here! Sausage, bacon, french toast, pancakes, waffles... you name it! We actually had this recipe for lunch but it was STILL delicious! Flavorful and meaty with just the right amount of cheese. Try it and you will love it too! This recipe and picture are from Three on Food and can be found here.

BREAKFAST PIZZA
From Three on Food

1 can refrigerated pizza dough
1 pound bulk pork sausage
1 cup frozen shredded hash brown potatoes, thawed
1 cup shredded Cheddar cheese
3 eggs
1/4 cup milk
1/4 teaspoon pepper
1/4 cup grated Parmesan cheese

Unroll pizza dough and place on a greased 12-in. pizza pan; press up sides of pan to form a crust. In a skillet, brown sausage over medium heat; drain and cool slightly. Sprinkle sausage, hash browns and cheddar cheese over crust. In a bowl, beat eggs, milk and pepper; pour over pizza. Sprinkle with Parmesan cheese. Bake at 375 degrees for 28-30 minutes or until golden brown. Let stand 10 minutes before cutting.

Monday, November 9, 2009

Personal English Muffin Pizzas

This recipe is a classic from my family! What easier way to feed a family than with a bag of English muffins, a bowl of pizza sauce, and whatever ingredients they personally want? These are so simple and quick that you will find it difficult to ever want to make pizza crust again! Unfortunately the picture is not mine. I got it from this cute blog: http://iheartfood4thought.wordpress.com/.

PERSONAL ENGLISH MUFFIN PIZZAS

1 bag English Muffins
Any pizza toppings you and your family likes

SAUCE
1 can tomato sauce
1 can tomato paste
1/4 tsp. Ground sweet basil
1/4 tsp. Oregano
1 1/2 Tbsp. Parmesan cheese
1/2 tsp. Sugar
1/4 + 1/8 tsp. Garlic powder

Mix all sauce ingredients together and spread on top of English muffins. Top with any pizza ingredient you can fathom. Bake at 400 degrees for ten minutes or until cheese has melted. Enjoy!

Wednesday, July 15, 2009

Bubble Pizza

This great recipe is from a blog on the web that is no longer available! Luckily, I snagged this classic recipe before that could happen. This is a regular at our house. It is so quick, easy, and versatile and Jake especially loves it, even as left overs.

BUBBLE PIZZA

1 jar pizza/tomato sauce OR *your own pizza sauce recipe
2 cups Mozzerella cheese
2 tubes buttermilk biscuits
Sausage, pepperoni, chicken, mushrooms, spinach, olives, onions, any pizza topping you love.

1. Open the two tubes of biscuits and cut the individual biscuits into quarters. Place in bowl and set aside.
2. Open or make your pizza sauce. Stir in with biscuits being sure to coat all of the pieces.
3. Add toppings, NOT CHEESE. Mix well.
4. Pour mixture into a GREASED 9x13 pan (Pyrex is best).
5. Cook at 350 degrees for 20 minutes.
6. Remove and sprinkle cheese over the top. You may not need all two cups (we didn't).
7. Bake another 10 minutes. Remove from oven and let cool. Serve.

*Classic Pizza Sauce (adjusted particularly for this recipe)

1 can tomato sauce
1 can tomato paste
1/4 tsp. Ground sweet basil
1/4 tsp. Oregano
1 1/2 Tbsp. Parmesan cheese
1/2 tsp. Sugar
1/4 + 1/8 tsp. Garlic powder

Mix all ingredients together.