About Me

My photo
Who am I? Wife. Mother of 2. "Newbie" to fitness. Personal Trainer-in-training. Lover of health. Fitness. Religion. Family. Gluten and refined sugar intolerant. Welcome to my journey. Learn with me.
Showing posts with label Side Dish. Show all posts

Thursday, May 24, 2012

High Protein Quinoa Almond Berry Salad

Wow. I have been so neglectful! So sorry. We have been adjusting to a new schedule around here with the start of the "summer" and things have been pretty busy.

Like I said on my last post, I actually made this salad twice last week - once for a combined Family Home Evening and once for a Bridal Shower. It was devoured both times. Everyone commented on the unusual ingredients but talked about how they still liked it. LOL.

The greatest thing about this salad is how versatile it is. It calls for cherries but have you seen the price of cherries? OH MAN! This would be an intensely expensive salad! I was lucky the first time around and caught blueberries on sale. So the first salad consisted of strawberries, blueberries, and 1 1/2 large banana slices. The second time around blueberries were no longer on sale so I only did strawberries (2 lbs. worth) and bananas (3 bananas worth). It was delicious both ways. I will admit that I liked it better with the blueberries and I am sure it would be amazing with the cherries as well. Whatever way you do it - do it! This salad rocks!

The picture from the original recipe is too gorgeous to not post. My picture didn't turn out anywhere as beautiful as this one. So extra special thanks to Oh She Glows for the courtesy of the recipe and the picture found at this site HERE.


High Protein Quinoa Almond Berry Salad (Vegan & GF)
From Oh She Glows
Yield: 2-3 as a main, 4-6 as a side. (I think that this isn't quite accurate for a side dish... I think we could easily serve at LEAST 6 with this salad but the nutritional information is based on 6 anyways.)

Nutritional Information per serving (calculated on MyFitnessPal.com): Calories 214, Carbs 38, Fat grams 6, Protein 6 (This would be lower without the almonds but almonds are SOOOO good for you!)

  • 3/4 cup dry quinoa
  • 1 pint strawberries, sliced (2.5-3 cups)
  • 16 oz. fresh blueberries (1.5-2 cups)
  • 1 cup cherries, pitted and sliced
  • 2 tbsp pure maple syrup (or other liquid sweetener)
  • 1 tsp balsamic vinegar
  • 1 tbsp fresh lime juice (or lemon might work!)
  • Pinch of kosher salt
  • 1/2 cup almonds, chopped


1. Cook quinoa according to package directions.
2. Meanwhile, chop the fruit and place in a large bowl.
3. Mix the dressing ingredients (maple syrup, balsamic, lime juice, salt) in a small jar and adjust to taste if necessary. Note: You may have to double the dressing recipe if your salad is quite large.
4. Fluff cooked quinoa with a fork and add to large bowl with fruit. Combine. Pour on dressing and mix well. Serve immediately or chill in the fridge until serving time. Serves 2-3 as a main or 4-6 as a side. Or if you are reeeeally hungry 2 people!

Monday, April 9, 2012

Monterey Chicken

Monterey Chicken used to be one of my favorite things to get at Chili's. Moist and juicy chicken covered in barbecue sauce, melted cheese and bacon. Needless to say, this is a pretty indulgent meal. But I have good news for you - there are things you can do to make this dish without having to feel super guilty for eating it!

First off, acquaint yourself with turkey bacon. Yes. Do it. Don't whine at me and tell me that it isn't the same. It has EXACTLY the same flavor! And if you cook it correctly, it has the same texture. And guess what? It only has a portion of the calories and fat of normal bacon. And no, it is not packed with tons of sodium to make up for the taste. AND it is only $10 for a box of 3 big packages at Sam's Club. Just do it!

Secondly, you do not need a ton of cheese to enjoy a meal. Let me repeat. You DO NOT need a ton of cheese to enjoy a meal. Cheese should be viewed as a condiment. It doesn't have much of its own flavor - it relies on other things. Just a little sprinkle of cheese and you will be set. Plus, I challenge you to cut back on the amount of cheese you use and be AMAZED at the flavor that your food has all by itself.

Thirdly, there are a lot of options for barbecue sauce. Read some nutritional labels. I have heard tell that Harmons has some amazing 0 calorie sauces. I haven't checked it out yet but I am definitely interested. However, if you follow the other suggestions I have made and just use your barbecue a bit sparingly you should be just fine. (I used Sweet Baby Ray's.)

Fair enough? Okay. If you want to use normal bacon, smother it in cheese and use a cup of barbecue sauce per chicken breast that is totally your call. But I promise you, this is a fantastic and flavorful recipe as is.

MONTEREY CHICKEN
From Shayla's Kitchen

Makes 6 Servings
Nutritional Information per serving (calculated on MyFitnessPal.com): Calories 196, Carbs 11, Fat grams 7, Protein 24 (Based on 1/4 cup each cheese and BBQ sauce)

6 large chicken breast halves (for easier cooking on the grill cut the fat half of the breast in half lengthwise again)
6 slices of cooked turkey bacon, cut into small slices
1/4 - 1/2 cup cheese of choice (I used mozzarella)
1/4 - 1/2 cup barbecue sauce of choice (I used Sweet Baby Ray's)
*2 cans Rotel diced tomatoes with chiles
*3 sliced green onions
*Juice of 1 large lime

*I had homemade pico de gallo that I used instead of the Rotel, onions and lime. If you don't have it, this will be a good substitute.

Preheat oven to 400 degrees.

Grill chicken for 5-7 minutes until chicken is just cooked through. You want it to be tender and juicy, not tough. Place chicken in a 9x13 dish and top with barbecue sauce. Spread the barbecue sauce around so that it covers the top of your chicken breasts. Sprinkle each breast with bacon slices and cheese. Pour both cans of Rotel on top of the chicken followed by the green onion slices and the juice of the lime. Bake in the oven for 5 minutes or until the cheese has melted.

FANTASTIC AND EASY SIDE DISHES:

ROASTED BROCCOLI: Cut up a 1 lb head of broccoli into florets. Toss with 1 Tbsp olive oil and 1/4 tsp EACH salt and pepper. Place on a cookie sheet and roast in oven at 400 degrees for 20 minutes.

SAUTEED GREEN BEANS: Spray a large skillet with nonstick spray and heat on medium high heat. Rinse 16 oz. frozen green beans so there is no visible ice. Place green beans in skillet and sprinkle with lemon pepper seasoning. Sautee until beans are hot and start to brown and blacken (just a bit) on the outside.

Monday, February 20, 2012

Best Spanish Rice

This is a huge go-to side dish in our house. I LOVE this recipe and we frequently have it with all of our Mexican dishes. It is super easy too. I make mine in our pressure cooker but I am sure you could do it in a rice cooker or a normal pan as well. I do several things differently than the original recipe but if you want to see the original you can find it and the source of the picture at this site here: http://allrecipes.com/recipe/best-spanish-rice/detail.aspx

BEST SPANISH RICE
From Allrecipes.com

1 Tbsp olive oil
1/2 medium onion, chopped
1 1/2 cups uncooked white rice
2 cups chicken (or vegetable) broth
1 cup chunky salsa

Place all ingredients in rice cooker. Stir twice and cook as you would normal rice.

OR

Place all ingredients in a large saucepan. Bring to a boil. Reduce heat to simmer and cover. Cook, COVERED, for 20 minutes - DO NOT LIFT LID!

Fluff with fork before serving.

Tuesday, January 3, 2012

Fluff

This recipe is an incredibly easy side dish that goes great with many different meals. I would recommend cutting back on the boxes of strawberry jello. It definitely didn't need 2 and got to be kind of grainy. I think next time I will only do 1 and I will definitely cut up some fresh strawberries to go with it. Or even banana slices would be yummy! The best thing about this is you can change it up to any flavor you want. Orange with mandarin oranges in it, or pineapple with pineapple chunks! Be creative and go for it!

This recipe and picture are courtesy of Sadie's Kitchen and can be found at this site here: http://sadieskitchen.blogspot.com/2011/05/fluff.html

Fluff
From Sadies Kitchen

3 cups cottage cheese
2 (3 oz) boxes of strawberry jello (Add the second box slowly to adjust to your personal tastes)
1 container of cool whip
Strawberries (optional)

Whisk the jello powder into the cool whip. Add cottage cheese and stir well. Add fresh, sliced strawberries (optional) or have them for garnish. Refrigerate until serving.

Thursday, November 3, 2011

Roasted Sweet Potatoes

This is an incredibly easy and tasty side dish that goes well with so many meals! We have these at our house a lot. They are flavorful and filling and much better for you than normal fries or even other potatoes. YUMMY!

The picture is courtesy of For The Love of Cooking and can be found at this site here: http://fortheloveofcooking-recipes.blogspot.com/2009/03/roasted-sweet-potatoes.html

ROASTED SWEET POTATOES
From Shayla's Kitchen

2 large sweet potatoes
1 1/2 tbsp olive oil
1/2 tsp cinnamon
Your favorite dipping sauce (ketchup, bbq sauce, fry sauce, etc,)

Preheat oven to 400 degrees. Cut the sweet potatoes into cubes. (You can peel them first if you wish but I didn't.) Toss cubes with olive oil and cinnamon. Place in a single layer on a baking sheet and roast for 25-30 minutes. Serve with dipping sauce available. (We prefer Sweet Baby Ray's BBQ Sauce)

Wednesday, October 12, 2011

Flatbread

If you want one of the easiest side dishes in the entire world, especially good to pair with soup, this is it. All you need is some of these:

Source: here
One of these:

Source: here
And one of these:

Source: here

All you do is roll out the biscuits as thin as you can get them. Place on the griddle and heat for 30 seconds on each side. They really go fast so watch carefully. The biscuits will fluff as they cook so don't worry about rolling them really thin. You can top them with cheese, honey butter, or just serve on the side of soup. It really is that easy.

Tuesday, October 11, 2011

Grilled Corn on the Cob

I need to hurry and get this recipe in while we still have a few days in the 70s. Grilled corn on the cob is one of my favorite things in the world. It tastes so much different than boiled corn on the cob that it is worth the additional effort. And it really is so very easy.

All you have to do is:

1) Husk your corn and remove all the little strings.
2) Place corn in the sink and let soak under water for at least 30 minutes.
3) Season as desired. You can rub it down with butter and sprinkle with salt and pepper or get really fancy and use parsley and parmesan. Just use whatever sounds good.
4) Wrap in heavy duty aluminum foil or double wrap in normal foil.
5) Place on the top rack of a preheated barbecue grill. This is great because you can still cook your meats and everything on the bottom rack of the grill while your corn sits happily on top, cooking away!
6) Cook for 15-20 minutes, turning every 5 minutes.
7) Carefully unwrap as the corn will be hot and you don't want a face full of steam!

Picture is courtesy of this site here: http://s3.hubimg.com/u/2242926_f520.jpg

Saturday, September 17, 2011

D's Famous Salsa

There is a plethora of fresh veggies going around right now with all of the gardens being ripe for harvest. We reaped the benefits of family gardens since we don't have our own and made some delicious salsa. This recipe is a great one and I have TWO versions for you! Some members of our family preferred each version so try both and see which one you like best.

VERSION 1: The original. If you don't have fresh veggies on hand and you don't want to buy them, you can make this homemade salsa with things from your pantry. This salsa is definitely more sweet and it has a red color to it that is much darker than the fresh salsa. This salsa tastes a lot like the salsa that you would get in the jar like Pace Picante. Recipe and picture are courtesy of Allrecipes.com and can be found at this site here: http://allrecipes.com/Recipe/Ds-Famous-Salsa/Detail.aspx

D’S FAMOUS SALSA
From Allrecipes.com

  • 2 (14.5 ounce) cans stewed tomatoes
  • 1/2 onion, diced* (I actually used green onions with the green and white parts sliced)
  • 1 teaspoon minced garlic
  • 1/2 lime, juiced (about 1 Tbsp.)
  • 1 teaspoon salt
  • 1/4 cup canned sliced green chiles, or to taste
  • 3 tablespoons chopped fresh cilantro
  1. Place the tomatoes, onion, garlic, lime juice, salt, green chiles, and cilantro in a blender or food processor. Blend on low to desired consistency.
*NOTE: When you dice the onion make sure you don’t dice it too much otherwise it will get very strong when you blend it up and it releases its juices. Also, I used a spoon to stir up my ingredients before I started blending so that the blending distribution was more even.

VERSION 2: The fresh. If you DO happen to have fresh veggies on hand this recipe is a great variation. It is definitely more spicy and tastes really fresh. It is not as sweet and tastes more like the fresh salsas you can get at Cafe Rio.

D’S FAMOUS FRESH SALSA
Adapted from Allrecipes.com

  • 3 cups tomatoes, cut into small pieces
  • 1/2 onion, diced
  • 1 teaspoon minced garlic
  • 1/2 lime, juiced (about 1 Tbsp.)
  • 1 teaspoon salt
  • 1 large anaheim pepper diced with seeds included
  • 3 tablespoons chopped fresh cilantro
  1. Place the tomatoes, onion, garlic, lime juice, salt, peppers, and cilantro in a blender or food processor. Blend on low to desired consistency.

Tuesday, September 6, 2011

Grilled Zucchini Rounds

I have a new favorite way to eat zucchini. Grilling zucchini has got to be one of the tastiest things on the planet. Hands down. I could eat an entire plate of this stuff by myself. And it is incredibly easy to make. If you have one of those monster zucchini that so many people seem to have in abundance these days this is the PERFECT way to use it up!

The picture is courtesy of Chalene Johnson's Blog and can be found at this site here: https://www.turbokick.com/wblog/?p=689

GRILLED ZUCCHINI ROUNDS
Printer Friendly Version

1 large zucchini
Butter, melted
Lemon Pepper

Heat grill. Slice zucchini into 1/2 inch rounds. Brush one side of each round with melted butter and sprinkled lightly with lemon pepper. Place zucchini buttered side down on warm grill. Brush top sides with butter and sprinkly lightly with lemon pepper again. Grill to desired tenderness but be careful of excessive burning. Some blackness is okay. Serve warm.

Yield: about 20 rounds

Saturday, July 30, 2011

Twice Baked Potatoes

It seems like one of the hardest parts of meal planning is planning what to serve with your incredibly awesome main course. You want something delicious and complimentary to your main dish but you absolutely don't want to spend the amount of time preparing it that you would a main course.

The second conundrum that you may face that this amazing side dish will solve is the bother of getting to dinner, very hungry, only to have to assemble a baked potato. In fact, my husband dislikes this so much that he will take any kind of style of cooking potatoes as long as he doesn't have to do the compiling. Now, obviously, if you are doing the cooking this isn't going to help you but everyone else will love you for doing the "hard" work.

And honestly, this was so easy! I threw my potatoes in the oven for an hour, compiled my main course, and then finished these up while my main course was cooling off enough that we could consume it. And they were DELICIOUS! My husband loved it and I loved it and I can't wait to eat the leftovers today! This was a perfect pair with our Steak with Onion-Bleu Cheese Sauce and is a recipe we will repeat again and again!

The recipe and picture are courtesy of the wonderful Mel's Kitchen Cafe and can be found at this site here: http://www.melskitchencafe.com/2010/05/twice-baked-potatoes.html


Twice-Baked Potatoes
from My Kitchen Cafe (www.melskitchencafe.com)

*Serves 8 (as a side dish)

 4 large-ish russet potatoes, scrubbed clean
2 tablespoons butter, melted
2 cups shredded sharp cheddar cheese, divided
4 green onions, white and green parts thinly chopped
1/2 cup sour cream
1/4 cup milk
1 teaspoon salt
1/2 teaspoon freshly ground black pepper

Preheat the oven to 400 degrees. Pierce each potato three or four times with a fork and place in the oven (or on a baking sheet). Bake for about an hour, until a fork can easily be inserted into the potato. Remove the potatoes from the oven. Let them cool for about 5-10 minutes.

Carefully cut each potato in half lengthwise, so you get two "boat" shapes from each potato. Using an oven mitt or potholder, hold the potato in one hand and with a spoon scoop out the flesh into a bowl. Leave a thin border (a little less than 1/4-inch) of potato innards around the skin so that it isn't too fragile to hold the pumped up potato mixture.

Mash the potato flesh with a potato masher or fork until mostly smooth. Stir in the melted butter, 1 cup cheese, green onions, sour cream, milk, salt and pepper. Mix well.

Preheat the broiler and move an oven rack about 3-4 inches away from the broiler heating element.

Scoop the potato filling into the shells, mounding each potato shell full of the good stuff. Sprinkle the potatoes with the remaining 1 cup cheese and broil the potatoes until the cheese is golden and bubbly, about 5 minutes.

Tuesday, July 26, 2011

How to Boil Corn on the Cob Perfectly

Okay so this is really  not something I ever even thought about until I was about to put my corn in the pot and thought... uh oh... how do I do this? It seems simple enough, right? Husk corn, remove gross silky things, fill pan with water, bring to boil, remove corn.... But I knew that there had to be more to it than that. I turned to my trusty Google search engine and met the wonderful sight Joyful Abode with a post titled "How to Boil Corn on the Cob Perfectly." Fantastic! I read the reviews to make sure that it lived up to the hype and, sure enough, we went for it.

Now I have to admit that I should have Googled "how to pick out the perfect corn" before I bought my pieces and I was pretty skeptical about how they would taste - especially since we were supposed to be using them as a portion of a dinner we were serving to other people. But even with my less-than-average-corn-choosing-skills these turned out PERFECT! They were sweet and crunchy and I liked them so much that I might just have to get the leftovers out of the fridge right now and eat them! And when it is this simple, why not just try it?

The recipe and picture are courtesy of Joyful Abode and can be found at this site here: http://www.joyfulabode.com/2008/05/08/how-to-boil-corn-on-the-cob-perfectly-too-easy-for-a-recipe/

CORN ON THE COB – PERFECT BOILING METHOD
From Joyful Abode

  • Fill your pot with water.
  • Add 1/4 cup to 1/2 cup of sugar.
  • Drop in your corn.
  • Bring everything to a boil, making sure the sugar is dissolved in the water.
  • Boil for no longer than 8 minutes.
  • Remove from the water and let it cool enough for handling and eating.
  • Handle it and eat it

Monday, June 27, 2011

Best Marinara Sauce Yet

I love the taste of fresh ingredients and this sauce was definitely no exception. I don't know if I would go so far as to say it was the "best" marinara sauce I have ever had but it was definitely good. And it is so easy to throw together that it is well worth making the sauce from scratch. Now all I need is some good mozzarella sticks to dip in this sauce...

The recipe is courtesy of Allrecipes.com and can be found at this site: http://allrecipes.com/recipe/best-marinara-sauce-yet/detail.aspx (picture courtesy of Soup Loving Nicole)


BEST MARINARA SAUCE YET
Adapted from Allrecipes.com

2 (14.5 ounce) cans stewed tomatoes (you can also used diced tomatoes)
1 (6 ounce) can tomato paste
4 tablespoons chopped fresh parsley (or 4 tsp. dried)
1 clove garlic, minced
1 teaspoon dried oregano
1 teaspoon salt
1/4 teaspoon ground black pepper
6 tablespoons olive oil (we cut this back to 3-4 Tbsp.)
1/3 cup finely diced onion
1/2 cup white wine (we substituted chicken broth)

In a food processor place Italian tomatoes, tomato paste, chopped parsley, minced garlic, oregano, salt, and pepper. Blend until smooth.

In a large skillet over medium heat sauté the finely chopped onion in olive oil for 2 minutes. Add the blended tomato sauce and white wine/chicken broth.

Simmer for 30 minutes, stirring occasionally.

Tuesday, July 20, 2010

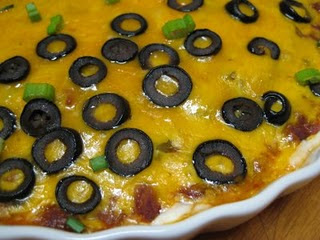
Friendship Dip

I blogged about this one awhile ago but I definitely didn't give it the shoutout it deserves. This stuff is GREAT and a big hit at parties. And the best part? It is REALLY easy to make! My sister says it would be even better with tomatoes. I don't like tomatoes so I don't feel the least bit guilty leaving them out. :) The picture and recipe are courtesy of Real Mom Kitchen and can be found here.

FRIENDSHIP DIP
From Real Mom Kitchen


1 (8 oz) package of cream cheese, softened
1 (15 oz) can of chili
1 (4 oz) can diced green chilies (I only use half)
shredded cheddar cheese
sliced olives
diced green onion (optional)

In a large pie plate (or a pizza pan will work) spread cream cheese. Then layer on top of cream cheese in this order: chili, green chilies, shredded cheddar cheese (enough to cover), and sliced olives. Bake at 350 degrees until hot and melted (approximately 20-25 minutes). Garnish with green onion and serve with tortilla chips.

Tuesday, April 13, 2010

Balsamic Roasted Red Potatoes

We got a 10 lb. bag of potatoes from Wal-Mart for $0.58 so I was online looking for ways to use them up. This recipe from Allrecipes.com got great reviews and smelled SOOOO good cooking up in my kitchen. The only thing I would do differently next time is to either thinly slice the wedges or poke holes in the potatoes before cutting them up. The flavoring on the outside was fantastic but it didn't get into the middle of the potatoes and so we just dipped our wedges in some more balsamic vinegar. They were definitely yummy!

BALSAMIC ROASTED RED POTATOES
From Allrecipes.com

• 2 tablespoons olive or canola oil
• 2 pounds small red potatoes, quartered (I used russet potatoes)
• 1 tablespoon finely chopped green onion (I used red onion and it was fabulous!)
• 6 garlic cloves, minced
• 1 teaspoon dried thyme
• 1 teaspoon dried rosemary, crushed
• 1/8 teaspoon ground nutmeg
• 1/4 cup balsamic vinegar
• 3/4 teaspoon salt
• 1/4 teaspoon pepper

1. In a large nonstick skillet, heat oil over medium-high heat. Add the potatoes, onion and garlic; toss to combine. Add the thyme, rosemary and nutmeg; toss well. Cook and stir for 2-3 minutes or until potatoes are hot.
2. Transfer to a 15-in. x 10-in. x 1-in. baking pan coated with nonstick cooking spray. Bake at 400 degrees F for 25-30 minutes or until potatoes are golden and almost tender. Add the vinegar, salt and pepper; toss well. Bake 5-8 minutes longer or until potatoes are tender.

Monday, April 12, 2010

Roasted Green Cabbage Wedges

YUM YUM YUM YUM YUM!!!!!!!!! I LOVE cabbage and this is my new favorite way to eat it! I never even thought about roasting my vegetables but it is seriously the best way to cook them. My husband was RAVING about this and that is always a bonus. And talk about cheap? It will cost you for the cabbage as long as you already have oil, salt, and pepper on hand. YUMMY!!! The picture is courtesy of a fabulous new cooking site I found called Meet Me in the Kitchen. You can find the site and recipe here. Thanks to Mary Ann Murray for this wonderful new recipe!

Roasted Green Cabbage Wedges from January 2010 Martha Stewart Living

Serves 8

1 small head green cabbage (about 2 1/2 pounds), cut into 8 wedges, core intact
1/2 tsp extra-virgin olive oil
salt and pepper
1 lemon, cut into wedges

Preheat the oven to 450 degrees F.

Arrange cabbage on a rimmed baking sheet. Brush both sides of wedges with oil. Season with salt and pepper.

Roast, flipping half-way through, until edges are brown and crisp, 25 to 30 minutes.

Squeeze lemons over cabbage.

Tuesday, January 5, 2010

Oven-Fried Chicken Chimichangas & Spanish Rice

We are Mexican people. That is all there is to it. We love Mexican food and I have a whole arsenal of recipes. This was a new one that I got from Campbell's Kitchen. They send me recipes daily. They turned out FANTASTIC and were so easy to make. I really liked the Spanish rice although Jake wasn't a big fan. I think I will try it again to see if I can improve it. I really liked it though - it was fast and easy and a great compliment to the chimichangas.

OVEN-FRIED CHICKEN CHIMICHANGAS

Ingredients:

2/3 cup Pace® Picante Sauce
1 tsp. ground cumin
1/2 tsp. dried oregano leaves, crushed
1 1/2 cups chopped cooked chicken
4 oz. shredded Cheddar cheese (about 1 cup)
2 green onions, chopped (about 1/4 cup)
6 (8-inch) flour tortillas
2 tbsp. butter, melted
fresh cilantro leaves

Directions:

Stir the picante sauce, cumin, oregano, chicken, cheese and onions in a medium bowl.

Place about 1/2 cup of the chicken mixture in the center of each tortilla. Fold the opposite sides over the filling. Roll up from the bottom and place seam-side down on a baking sheet. Brush with butter.

Bake at 400°F. for 25 minutes or until they're golden brown. Serve with additional picante sauce. Garnish with cilantro.

Tip: For 1 1/2 cups chopped chicken, in a 2-quart saucepan over medium heat, in 4 cups boiling water, cook 3/4 pound boneless chicken breasts or thighs, cubed, for 5 minutes or until the chicken is cooked through. Drain and chop the chicken. Serves 6.

EASY SPANISH RICE

Ingredients:

1 1/2 cups rice
2 1/2 cups chicken broth
1 cup plain tomato sauce*
3 cloves finely chopped garlic *
1/4 of a medium onion*
2 tablespoons oil
4 heaping tablespoons of finely chopped parsley (optional)

Preparation:

In a medium sauce pan, heat oil over medium heat. Add in the fresh garlic and onion. Saute for 1-2 minutes until softened. Add in dry rice. Stir for about 5 minutes until rice becomes a golden brown color.

Add in broth and tomato sauce (Slowly into rice, not directly onto hot pan!) Add in the parsley if you're using it. Stir it up and bring to a boil. Once it starts boiling, turn the heat to low and cover. Let it simmer for 20 minutes and fluff with a fork.

*If you don't have fresh garlic or onions on hand you can use the equivalent in powder form. Do not saute the powder, just skip that step and add the garlic powder and/or onion powder when you add the liquids. If you don't have tomato sauce you can use unseasoned stewed tomatoes, or canned diced tomatoes with their liquid.